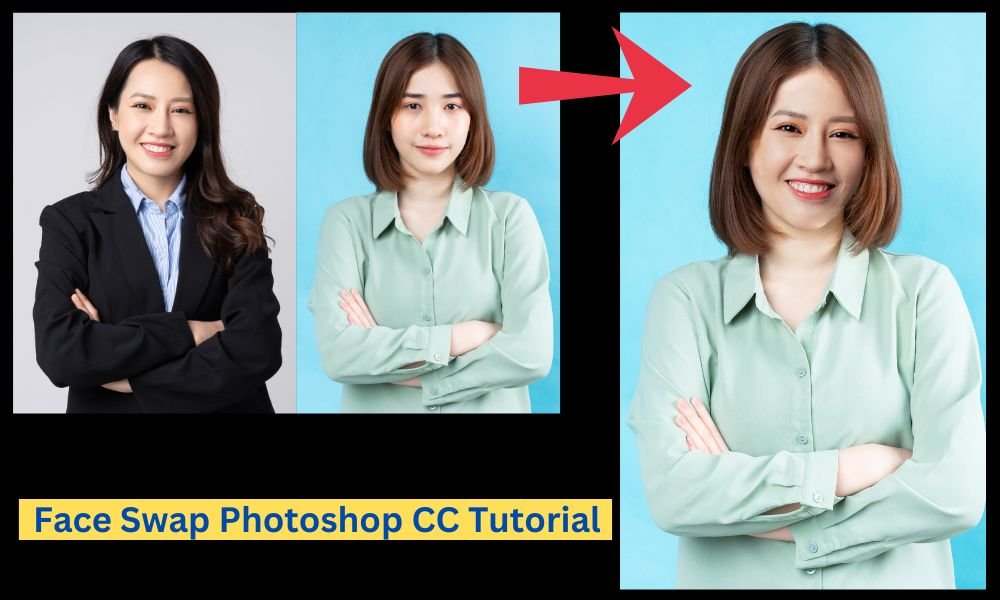
The Face Swap Photoshop technique helps to change the faces of different people like a pro.
It's a valuable tool for all marketers and e-commerce editors who want to save money on product photography.
Some photographs are nearly perfect; why not finish them with a simple face swap? A picture's face can be swapped or replaced in various ways.
Here, the Auto-Blend Layers tool in the edit menu is one of Photoshop's best ways to swap faces.
Face swapping in Photoshop is now easy enough for anyone with the right tool to do it.
So, in this tutorial, I'll show you how to swap faces in Photoshop step by step.
What Does Photoshop Face Swap Mean?
Photoshop face swap is a way to edit faces in Photoshop CC, where you take the facial structure of one person and put it on the face of another person's body.
But if you're doing it for commercial purposes, it's better to choose the appropriate face and body along with making any necessary changes at the end.
The Photoshop face swap method benefits e-commerce brands that want to get the most out of their spending on product photos.
How to Face Swap in Photoshop? [Step-By-Step Guideline]
One of the most widely used photo editing programs is Adobe Photoshop.
It comes with all the necessary tools, and if you know how to use each one, you can explore modifying different objects by following the tutorial.
Hence, this Photoshop face-swapping tutorial is for anyone who wants to learn how to swap faces in Photoshop CC.
Let's look at the key procedures we need to do before moving on to the tutorial part.
- Do some groundwork
- Open Your Photoshop Application
- Open Photo Files in Adobe Photoshop
- Select The Marquee Tool
- Outlining The Face
- Copying The Face
- Pasting The Face
- Resizing Your Image
- Making Other Adjustments
- Copy The Background Layer
- Choose The Elliptical Marquee Tool
- Overlapping The Face with The Body
- Deleting The Face
- Blend The Layers
- Select the healing brush tool and adjust the details.
Step #1: Do Some Groundwork:
Before editing to swap faces in Photoshop, you need to do some preliminary work.
Just select the photographs you want to use.
For simple modifications, the resolution and size must be precise and comparable.
If not, the body will appear huge compared to the face, or the face will appear larger than the body.
Also, if the photo resolution is low-quality, expanding the picture while making edits may result in fragmented or blurry results.
Another crucial factor to consider is the subject's position in the picture or how they face it.
If you are experienced, you can handle the tasks required to switch places.
But if you're a beginner, it's preferable to pick two pictures where everyone looks in the same direction or at an angle.
To avoid many problems, you should use photos with few details. Your overall photo editing task will be simpler.
Ensure that the light in both snapshots is as similar as possible. It will make it easier to blend the images later on.
Once you'll find the right photos that meet the above requirements, you can start the Photoshop face-swapping process.

Step #2. Open Your Latest Photoshop Application:
At present, there are numerous photo editing programs and tools available.
All of them are wonderful in their ways.
But if you want to edit your photos professionally, Adobe Photoshop offers you a different experience.
So, I made this guide with the most up-to-date photo editing software, Adobe Photoshop 2023.
Before reading this tutorial, ensure you have the latest Photoshop CC version.
You can open the app by clicking or double-clicking on the application icon if you already have it on your PC or laptop.
Once the app starts up, move on to the next step.
Step #3. Open Your Photo Files in Adobe Photoshop:
Next, open the two photographs you want to swap the face.
When you go to File and click on it, a drop-down menu with numerous options will appear.
Choose 'Open' at the top of the menu, and click on it.
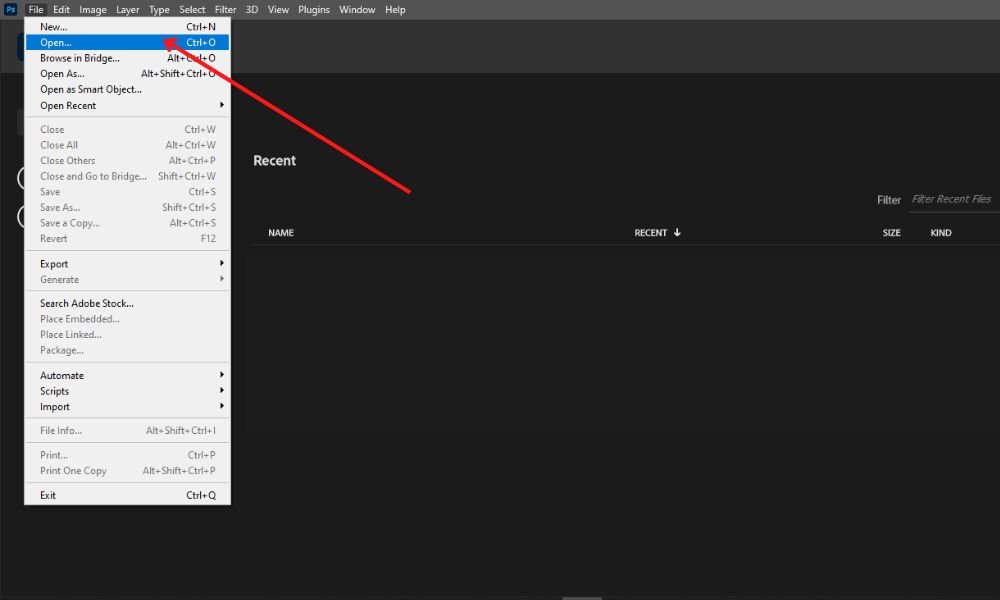
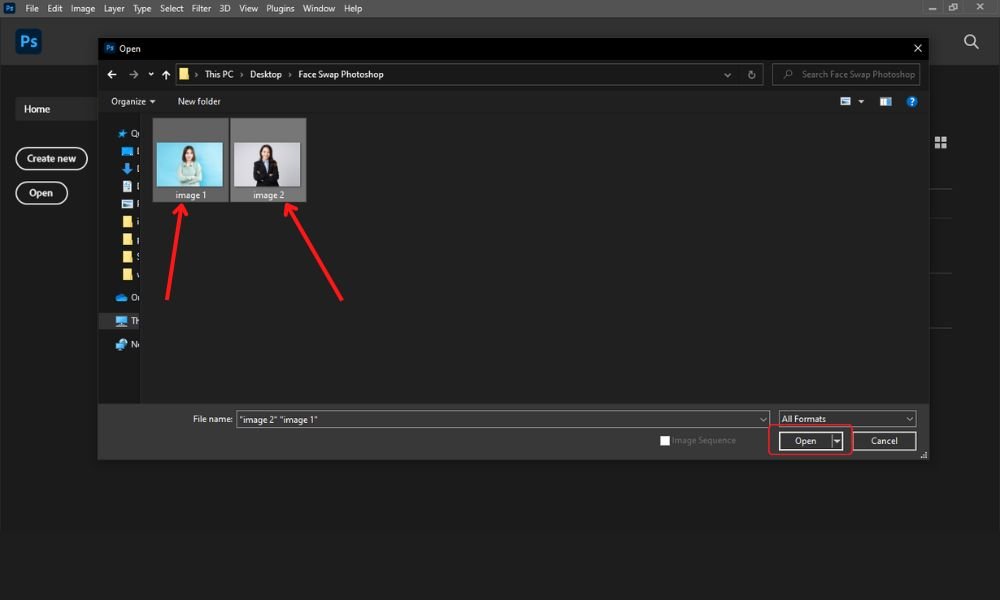
It will open a new window where you can select the photos you want to swap.
You can choose both images at once or just one.
Hold down the Ctrl key while clicking on both photos to select them both.
There are two ways to open and save the photos. They will appear as tabs in the software's default system, which you can keep.
You can also keep them in two windows if you want something else.
This alternative option is much better because it allows you to compare them side-by-side.
Besides, it makes your photo editing tasks more effortless as you don't need to open the tabs repeatedly.
In the top panel, select 'Window' to use the second (alternative) choice. After that, select 'Arrange.' Now, you can choose '2-up horizontal' or '2-up vertical' based on your preferences.

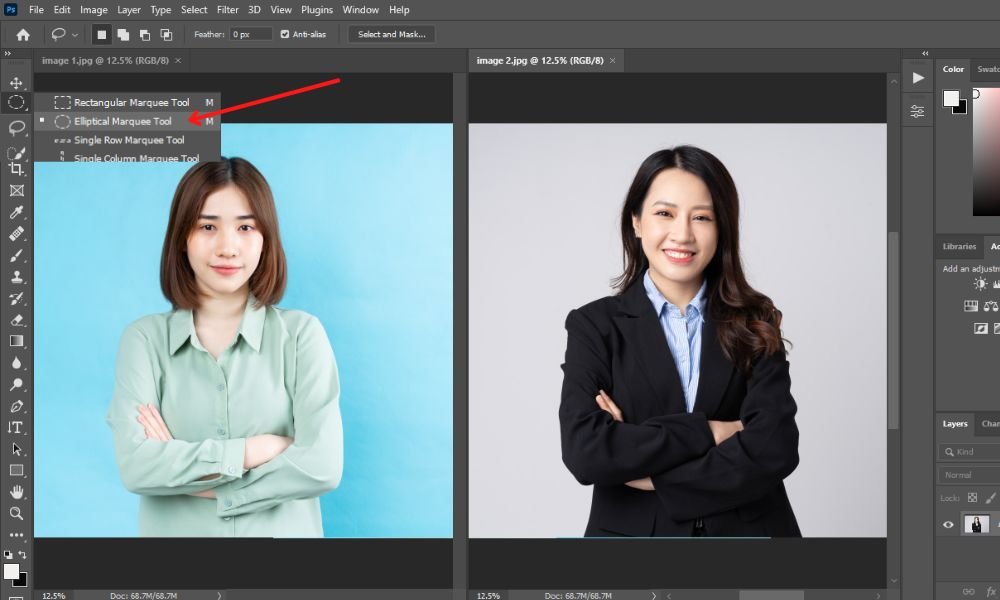
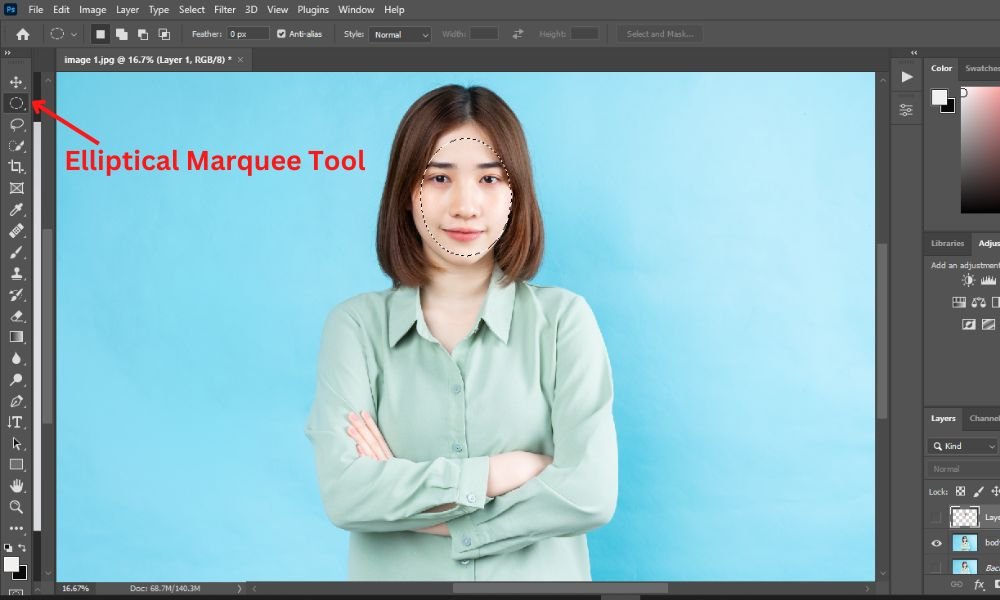
Step #4. Select the Elliptical Marquee Tool or Lasso Tool:
Before swapping a face, you must choose a tool and outline the sections you want to remove.
You have a few options regarding how to go about it.
A pen tool is an option that the majority of people may select.
However, if you are drawing a face outline, the Pen Tool simplifies the process and doesn't require much effort.
It's only sometimes what you require.
Here, I can recommend to use the lasso tool or elliptical marquee tool for this reason.
The Lasso Tool is as effective, but it necessitates drawing by hand.
The lasso tool can be helpful because cutting out the face can be done with little accuracy.
On the other hand, the elliptical marquee tool optimizes your face work outlines while saving you time and effort.
Hence, I selected this tool to work smoothly. To choose this option, go to the left-side toolbar.
Then select the 'elliptical marquee tool.' See the below image to get the point quickly.
Step #5. Outlining the Face:
The exciting part of Photoshop's face swap is just getting started.
After choosing it, drag the Lasso or elliptical marquee tool over the picture's face area.
Then select the features you want to modify.
Depending on your preference and needs, it can be just the eyes, the mouth, a portion of the face, or the full face.
Face swapping can refer to just a few elements or the entire face.
Hence, you can click on and choose any component of the photo with the lasso tool or elliptical marquee tool.
I've used the elliptical marquee tool here.
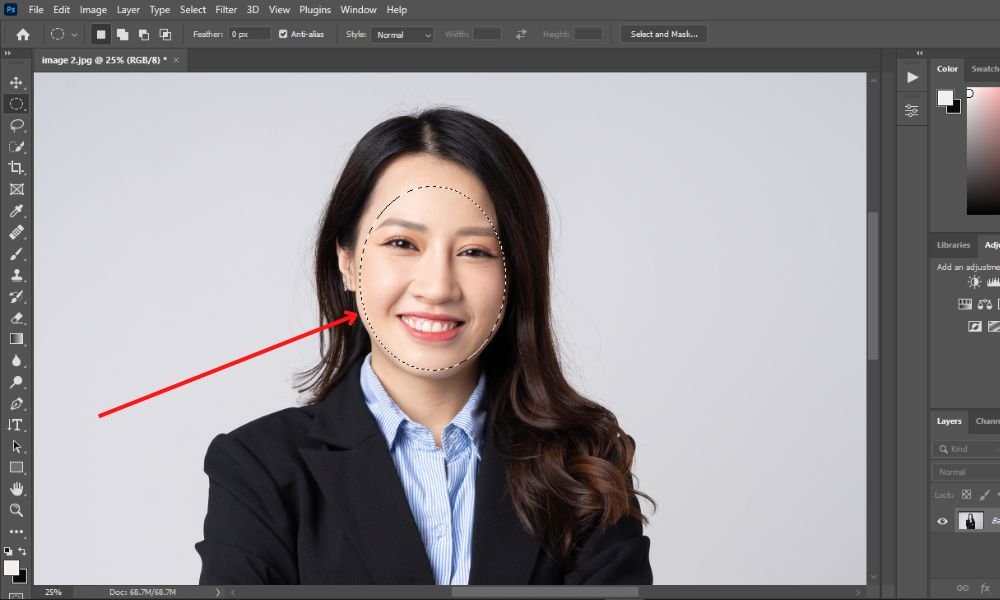
Step #6. Copying The Face:
Once you'll satisfy with your face choice, duplicate the highlighted region.
Copying the outline is a simple operation.
Next, to copy the face, press Ctrl + C together in Windows.
On the other side, if you're using a MAC, you can copy the image by pressing 'COMMAND + C.'
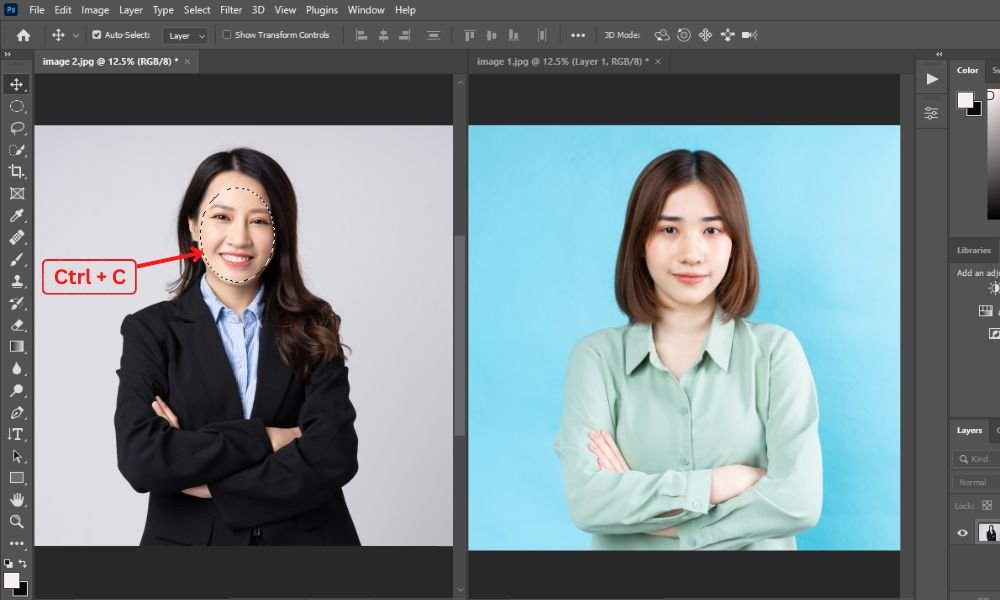
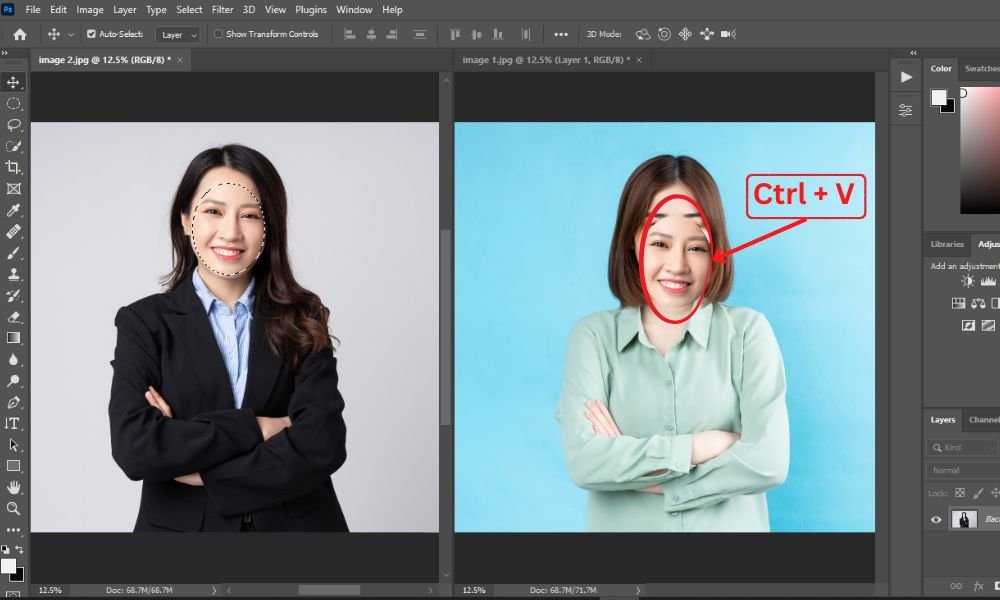
Step #7. Pasting The Face:
Based on how you viewed the images, there are two ways to use the paste command.
You must copy the outlined photograph and paste it over the other photo if you open the pictures in tabs.
After positioning the cursor on the second photo, you can do it by hitting the CTRL+V keystroke.
By hitting COMMAND+V on their keyboards, MAC users can execute it.
After hitting the Edit menu, you may find the Paste option on the drop-down menu if you don't want to use the keyboard.
Therefore, you can easily paste the photo if you open it in separate windows.
Click and drag the chosen face to the other image before letting go of the mouse.
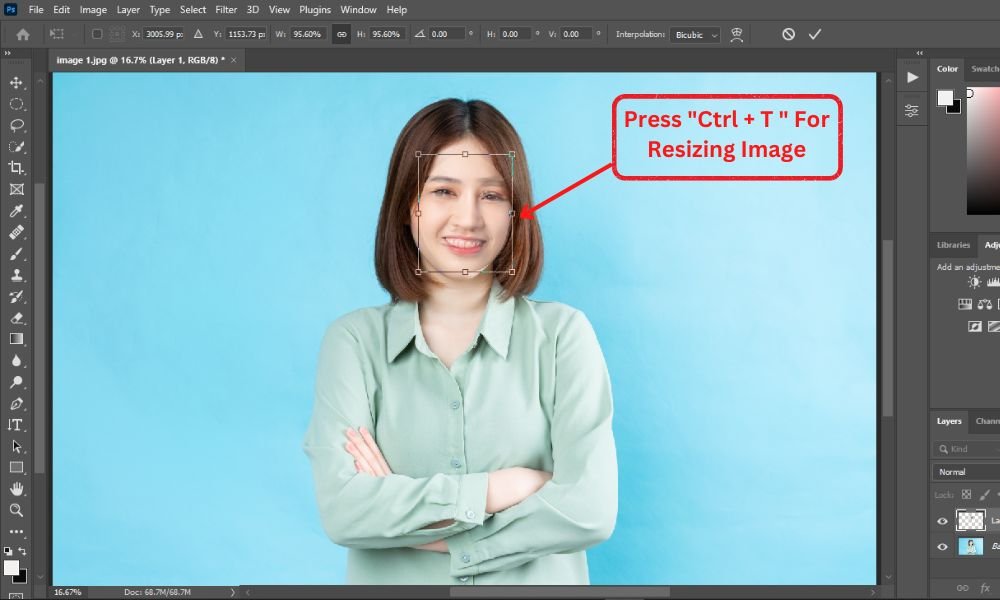
Step #8. Resizing Your Image:
You need to check the sizes of the cut-out faces carefully and the second face's fit to swap the face and make them appear natural.
If you want to understand how to swap faces in Photoshop, think of it as another crucial component you must know.
Next, reduce the opacity of the cut-out image to find the best blending size so you can also resize the face correctly.
To reduce the opacity to 68%, go to the layer panel.
You'll be able to see what's underlying because it will make the photo visible.
For resizing and placing the cut-out face on the new photo, press 'Ctrl+T' (COMMAND+T on a Mac).
Expand it as necessary to align the eyes, nose, and mouth with those of the other face.

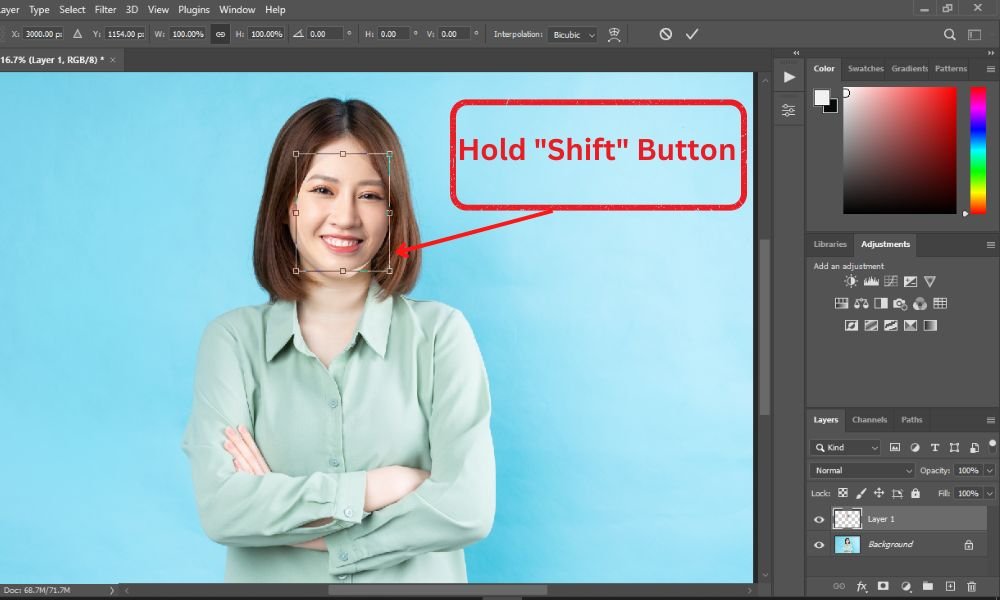
Step #9. Making Other Adjustments:
To arrange everything correctly, click and drag the cut-out photo box while holding the 'Shift' button on your keyboard.
You can rotate the box by clicking on one of its corners to get the eyes, nose, mouth, and other parts in the right place.
This portion will seem difficult to you if this is your first time.
Since achieving this talent involves a lot of practice, I suggest you continue and try your best.
The photo box must be moved and dragged until it appears as genuine as possible.
Press the Enter key as soon as you are satisfied with the outcome.
This step in the photo editing process is crucial because if you choose another editing option without pressing 'Enter,' your previous work will be gone.
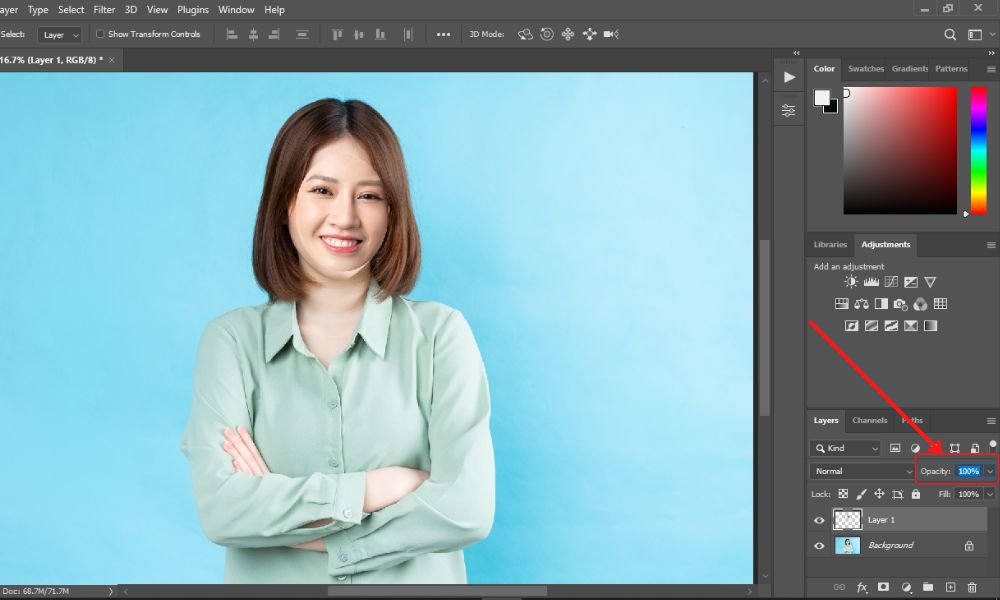
Then, turn the box picture's opacity to 100%.
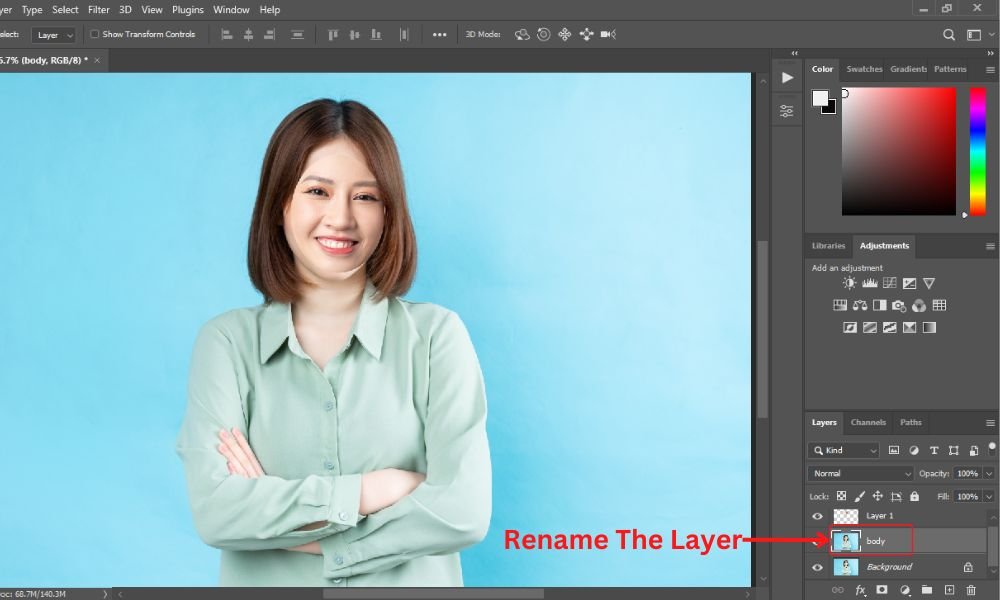
Step #10. Copy the Background Layer:
You may need to work on the incoming body and head after setting up the new face.
Let's begin by copying the background layer.
Return to the layer panel and click the drop-down option to access it.
You can find the background layer menu there.
You can also hit Ctrl + J (COMMAND+J on a MAC) to execute the shortcut command.
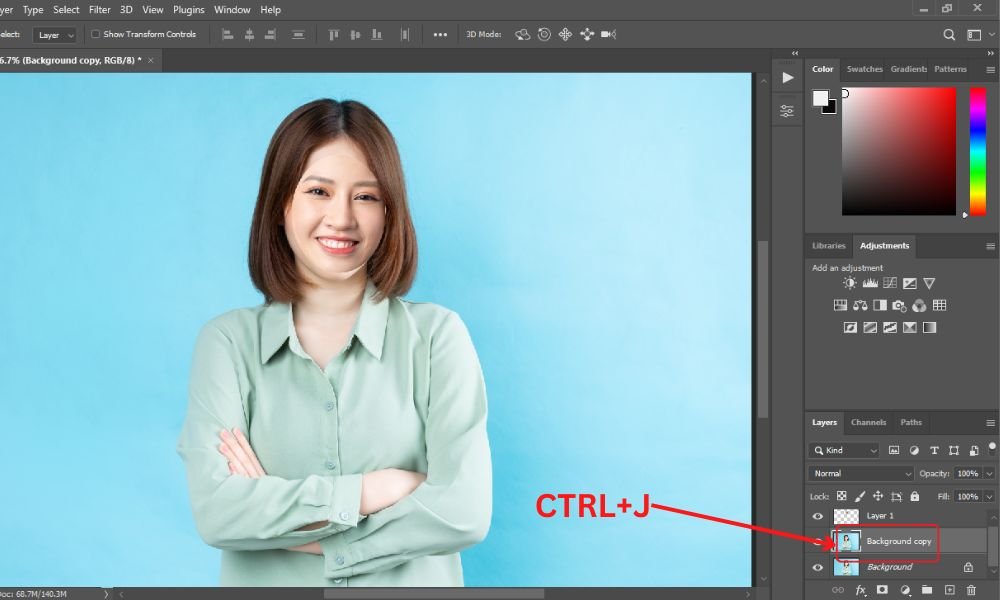
Next, it's better to rename the layer's name because this photo will be featured in most of the finished photographs.
Write the 'body' word by selecting the 'Rename' option or clicking over the layer.
The layer will become invisible after you click the box area next to it.
Step #11. Choose The Elliptical Marquee Tool:
In this step, you have to make the layers invisible first. Go to the 'Layers Panel' on your right side.
Then the eye symbols will disappear when you click on the box next to the layers (Layer 1 and the background layer).
It means that the layers can no longer be seen.
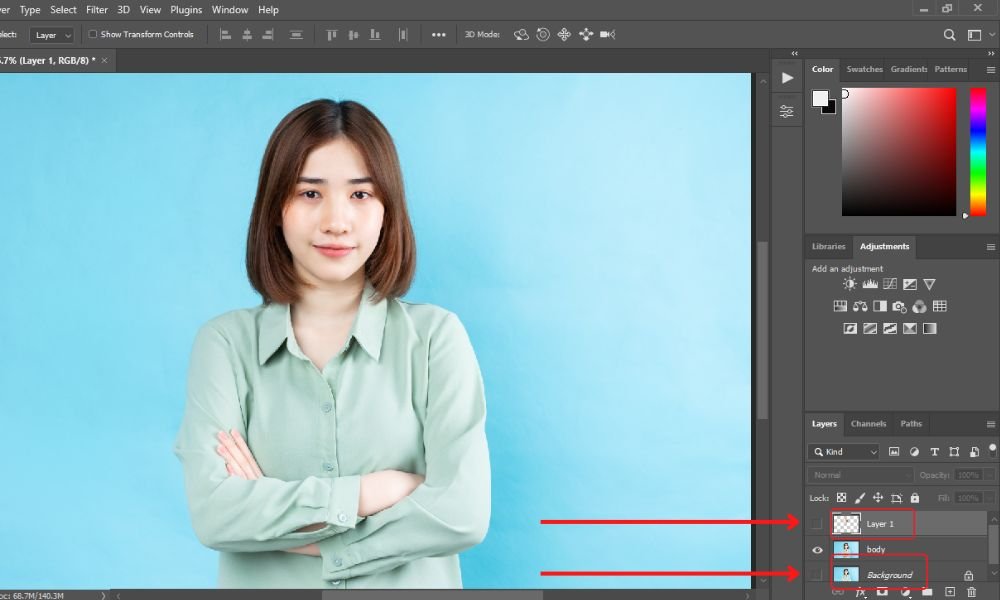
Next, you can select the elliptical marquee tool again. Outline the face appropriately with this tool and move on to the next step.
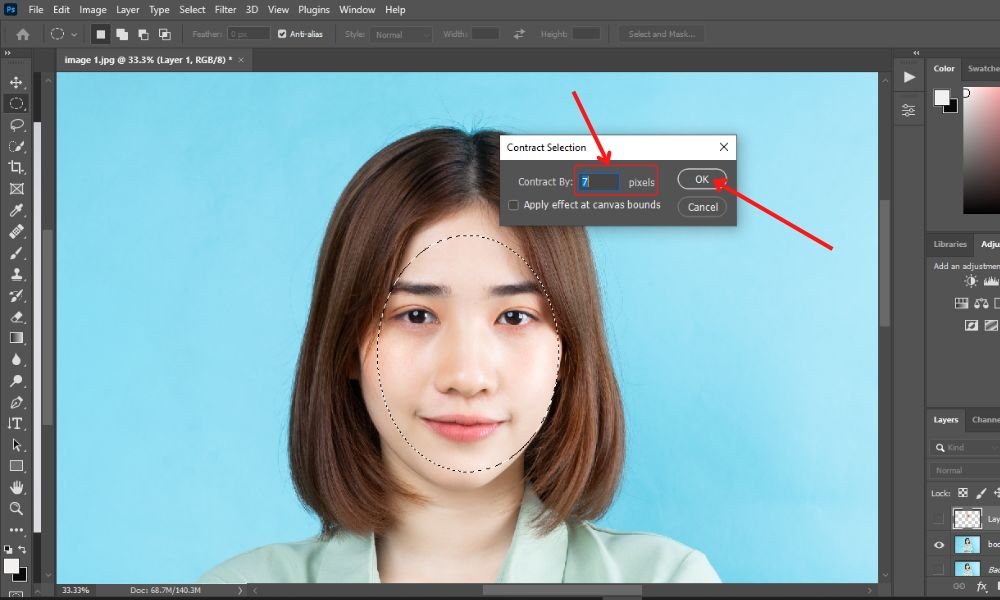
Step 12#. Overlaying The Face Image With The Body:
When you overlap photos, you put one picture over a part of another picture.
In this step, we'll overlap the images to ensure they still look natural even though the faces have been swapped.
Next, go to the top toolbar menu and click on the 'Select' option.
Then click 'Modify' and 'Contract' from the drop-down lists.
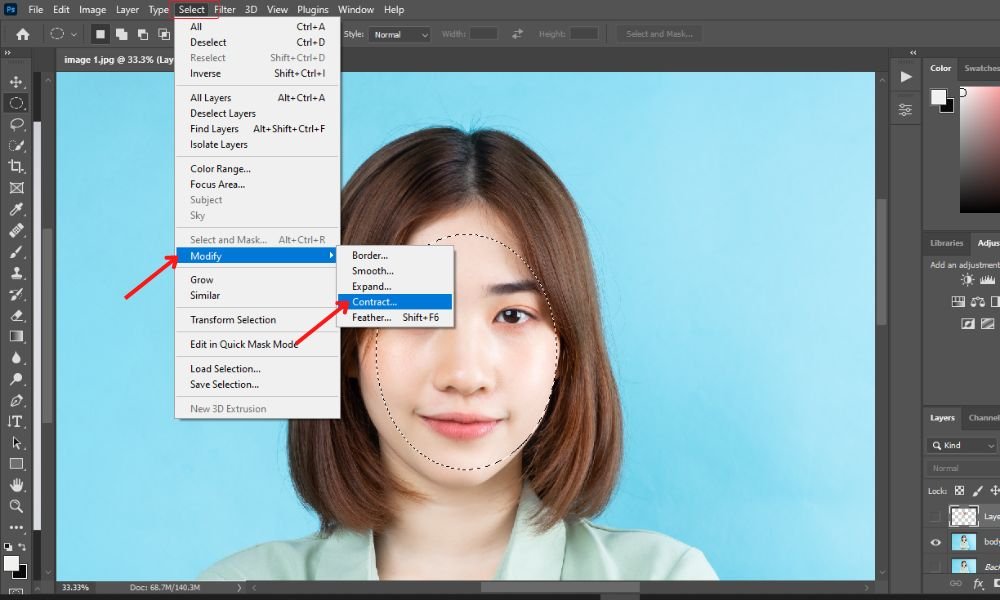
It will bring up a dialogue box (Contract Selection) where you can change the number of pixels for the contact.
You can set it up between 6 and 10 based on the picture. I placed '7' there and pressed the 'Ok' button.
Step #13. Deleting the Face:
Before you put the new picture on top of the old one, you should remove the old face.
To do this, press the 'delete' button.
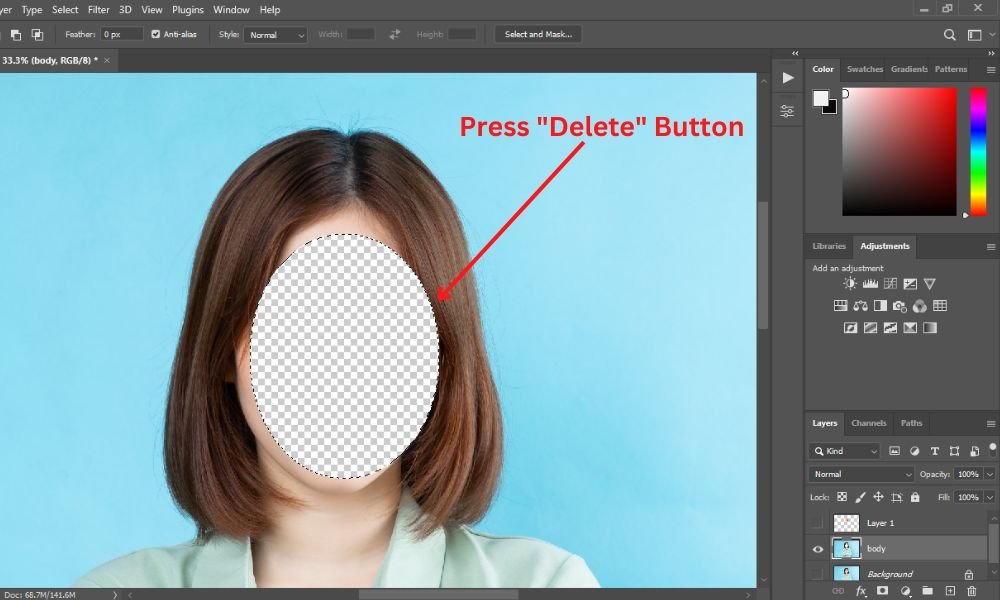
Hold the 'Ctrl' button (COMMAND on a Mac) and click on the Face Layer (layer 1) thumbnail.
If you do what it says, the location you copied and pasted before will be selected automatically, even if the layer isn't there.
Now, check to see if you are on the background layer again.
Since we've already done the overlapping, you don't have to make significant modifications here unless you want to alter the layers.
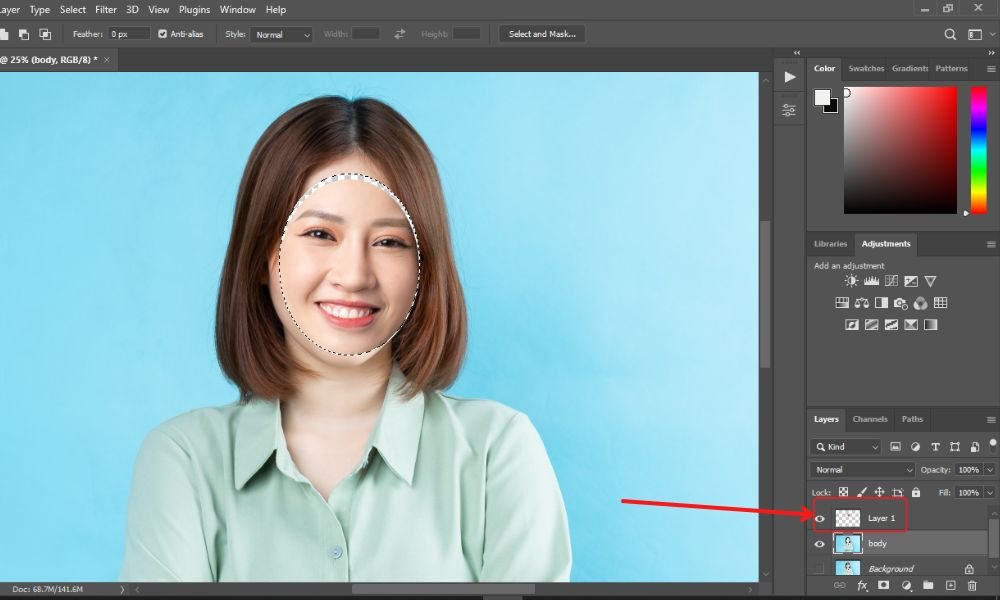
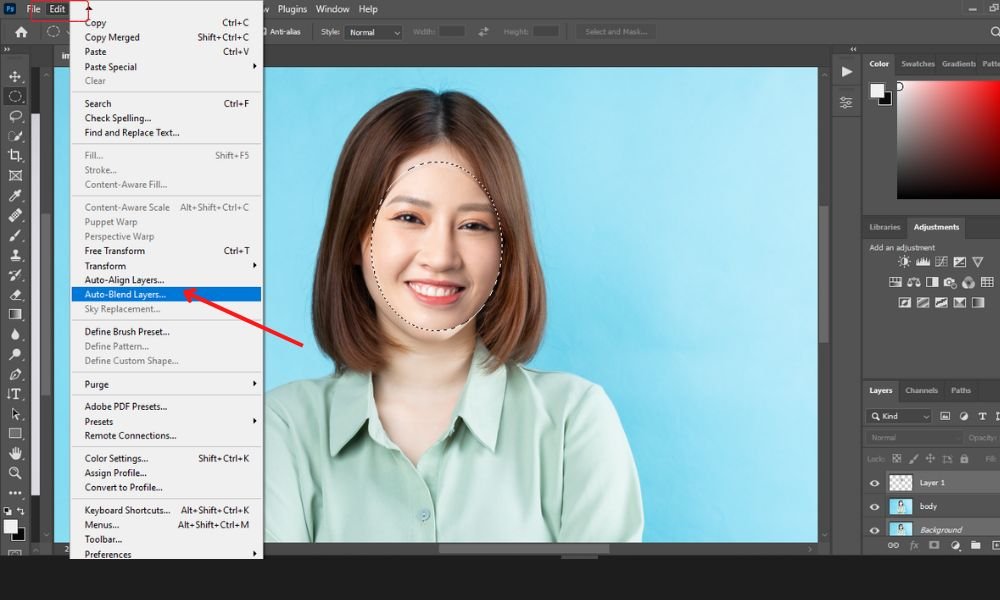
Step #14. Blending The Layers:
Make the face layer (layer 1) visible by clicking the empty eye symbol.
Then, with the Ctrl key (COMMAND on a Mac), select Face and Background Layer.
After that, go to the top toolbar menu. Select 'Edit' and pick the 'Auto-Blend Layers' option from the drop-down list.
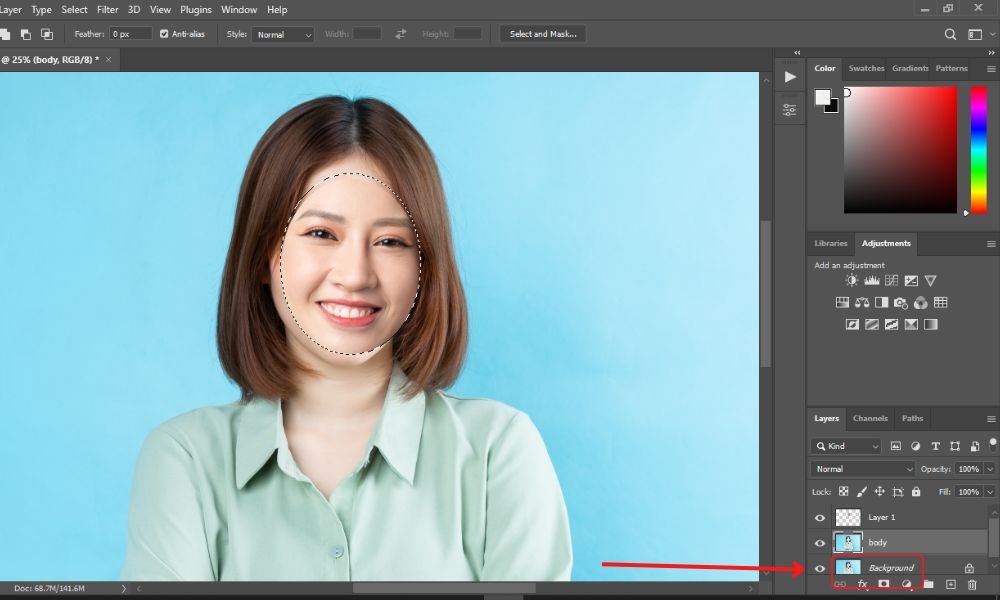
Next, a new pop-up will appear named “Auto-Blend Layers”. Now, choose “Panorama” from the pop-up window. Choose 'Seamless Tones and Colors' and also 'Content-Aware Fill Transparent Areas.'
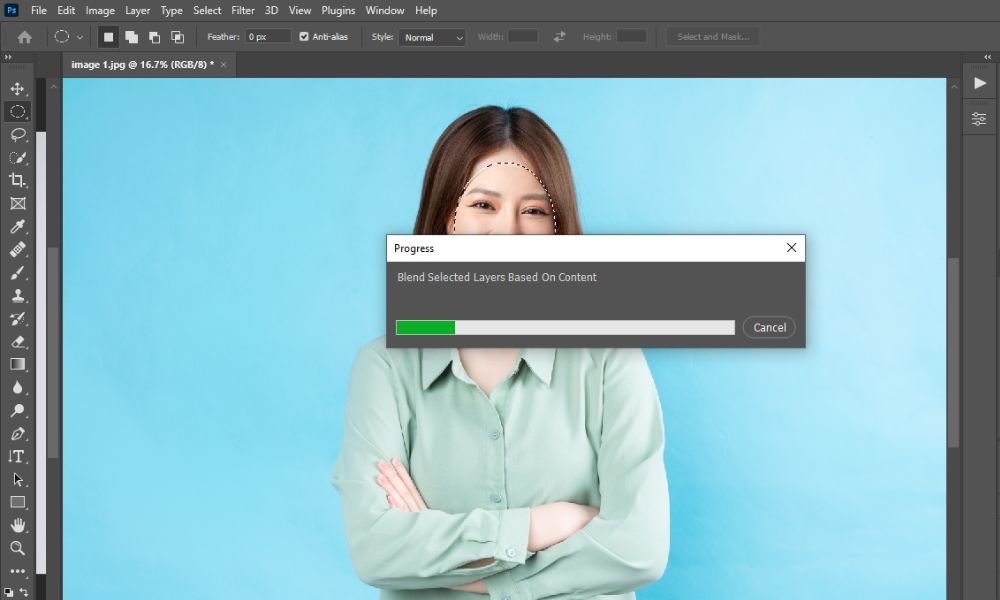
Once you click OK, the Photoshop face swap will be almost finished.
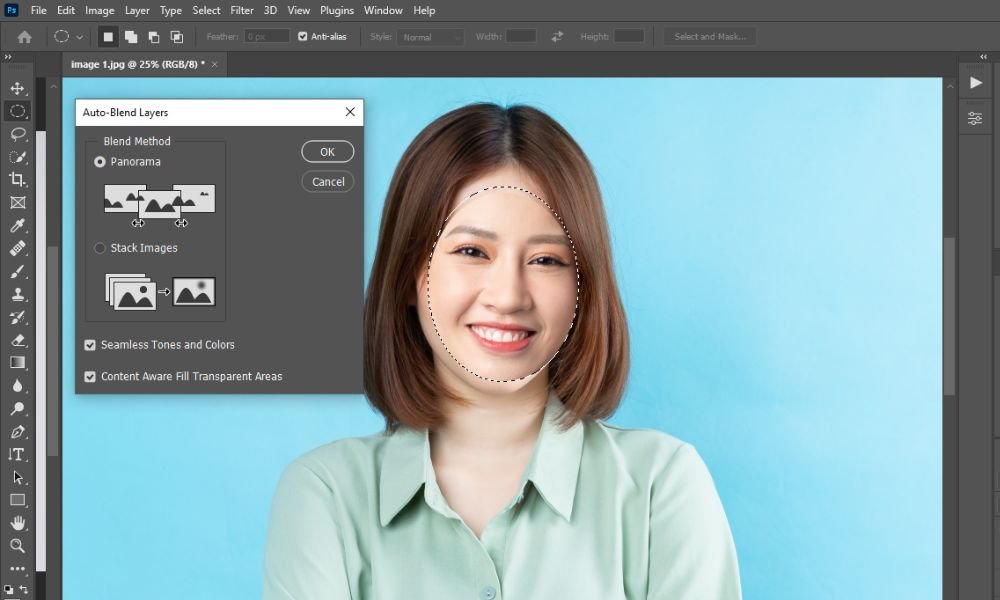
It’ll take some seconds to produce the output.
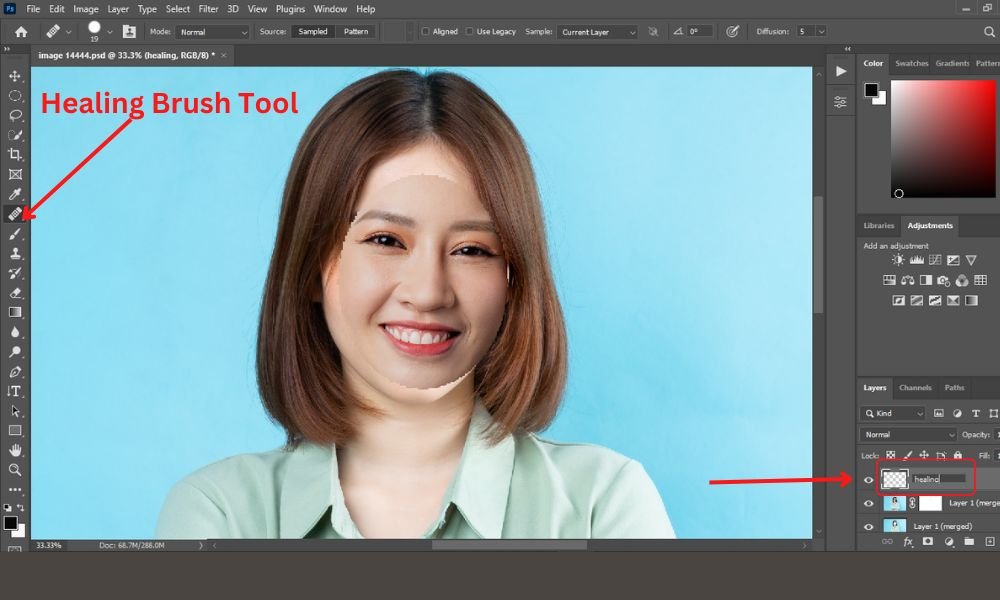
Step #15. Select The Healing Brush Tool And Adjust The Details:
Here is one more step you need to take before saving the image. Select ' Create Layer Mask'' from the drop-down menu in the Layer panel.
A white mask will be applied to the combined layer by selecting it.
Smooth the edges with the brush tool if necessary.
To ensure the photo contains exact details, you can also play with other features.
Hence, I've used the healing brush tool to do the final touching on the image. To use this tool, go to the toolbar menu on the left and select the 'healing brush tool' from the 'brush tool' category.
In the meantime, you can rename the new layer as 'healing' to remember the layer.
Next, go to the top toolbar menu and make some adjustments appropriately.
Choose 'normal' under the mode option. Select 'current & below' from the drop-down menu in the sample settings.
Now, scale the size, hardness, spacing, and other things of the healing brush tool based on your requirements and the image's needs.
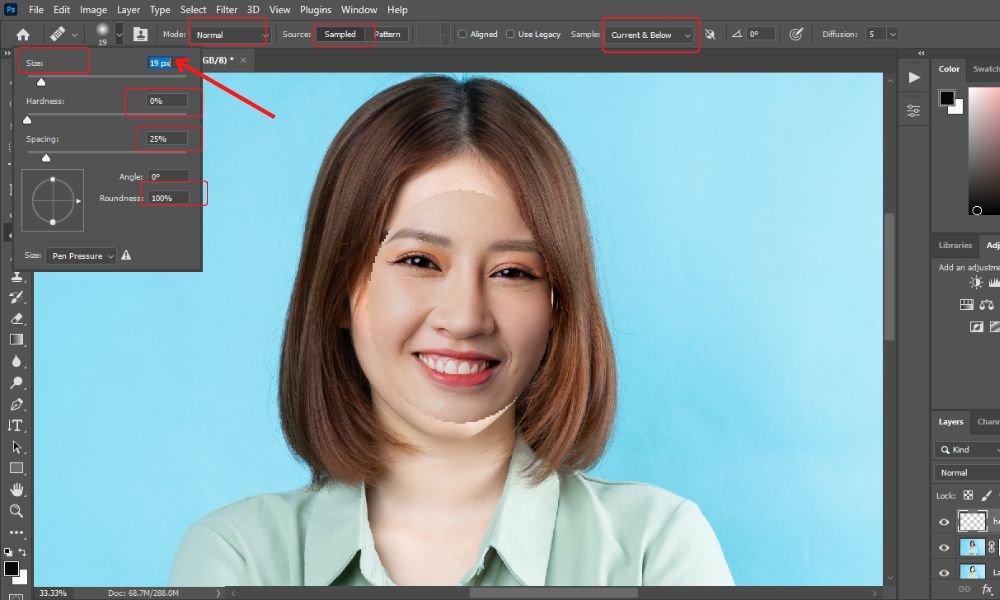
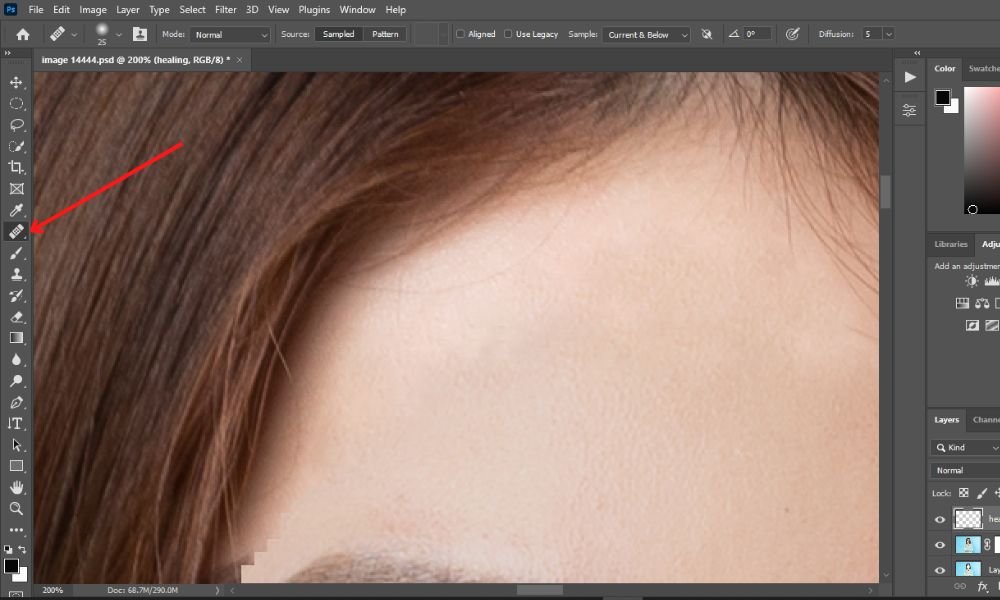
Then, start painting with the healing brush tool over the face image and give it a polished look as you can.
Take some time to face-swap in Photoshop CC. Do it until you are satisfied with the output.
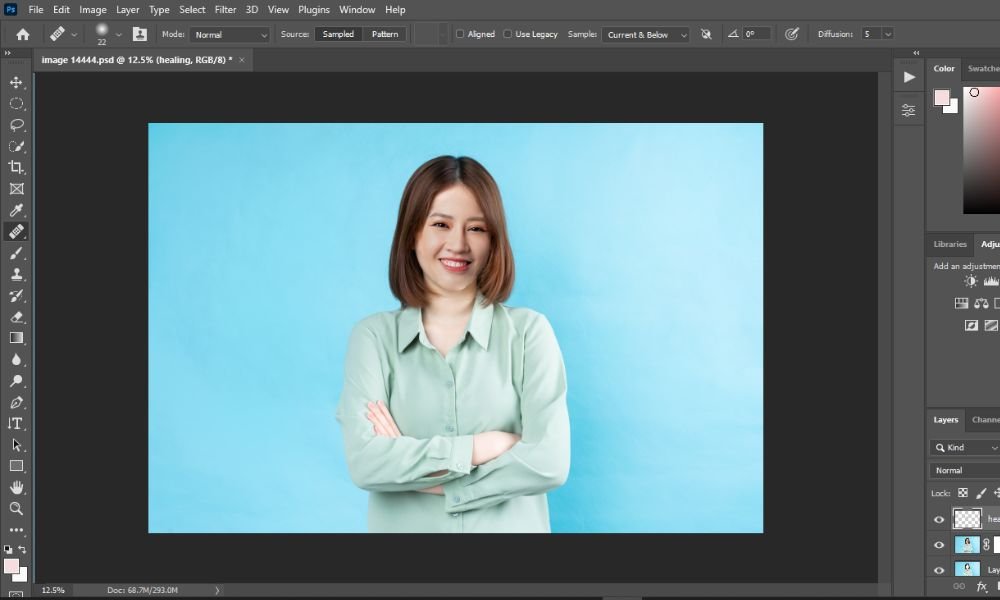
Then, go to the 'Adjustments' section on your right side. Select the brightness and contrast level depending on your photo's requirements.
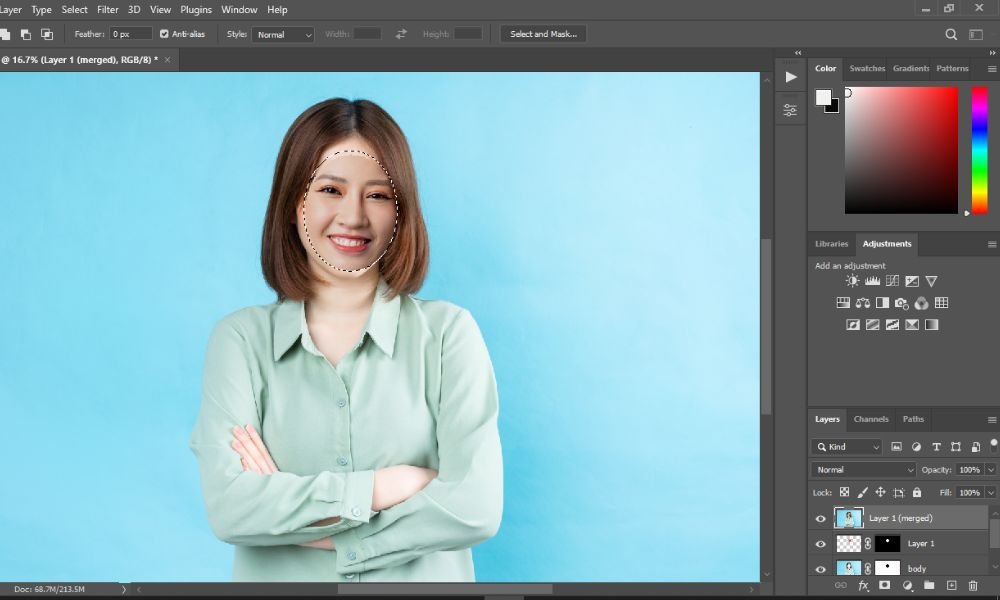
Finally, you are done. Congrats! You have successfully swapped faces in Photoshop CC.

Here is the final output.
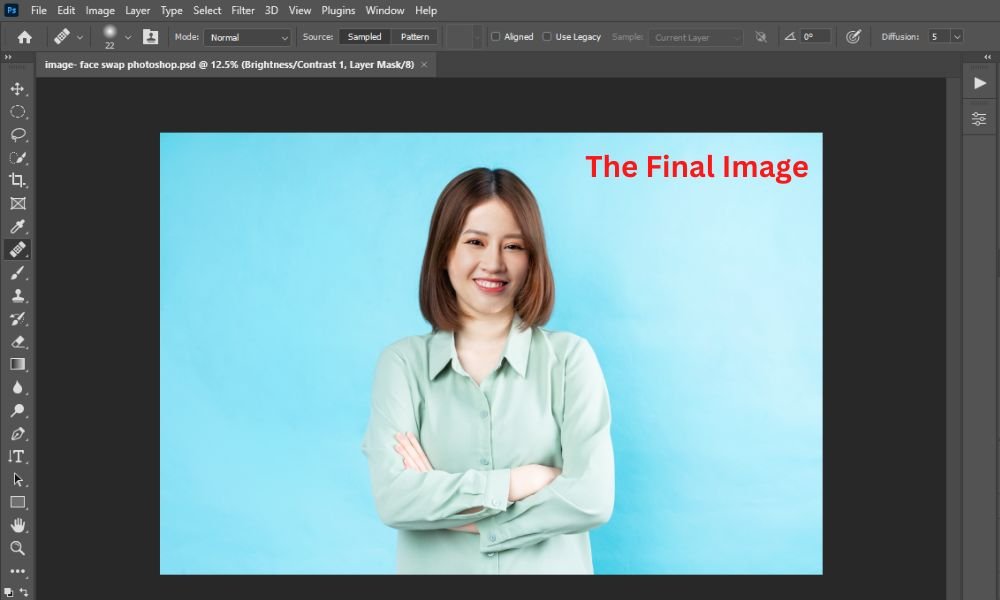
If you've done everything right, you'll be able to swap faces successfully.
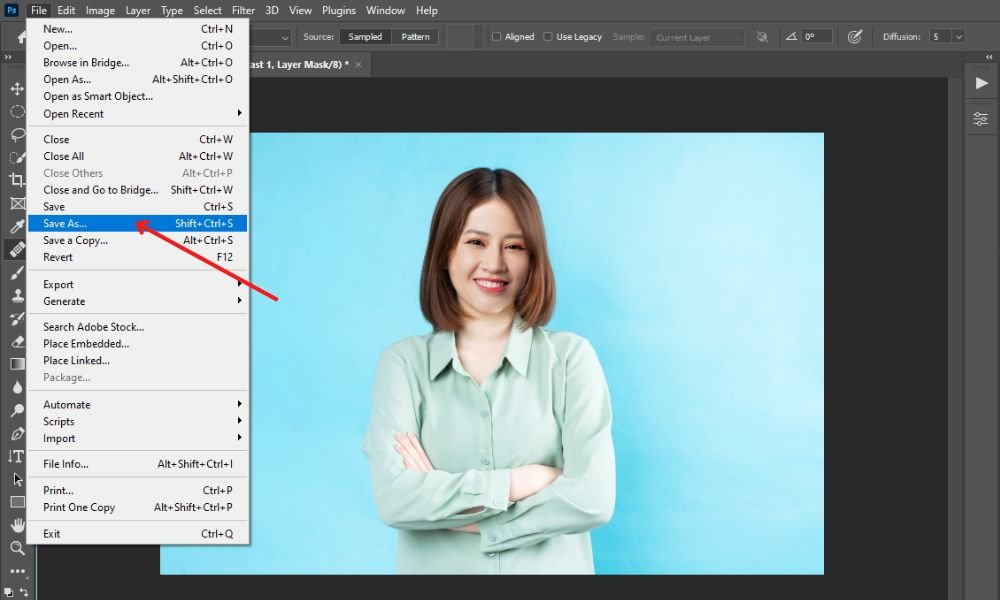
Finally, select the “file” option and choose “save as” from the drop-down menu. Then save the final image in any file format like jpg, PSD, etc. That’s it. You’re done!
Top Usages of Face Swap Photoshop Method:
Well! People need to deal with the face swap Photoshop process for various reasons. Face-swapping in Photoshop is done for reasons other than entertainment. Advertising, commercial photography, look trials, e-commerce sites, etc., can all benefit from this Photoshop trick.
Here are some uses of the Photoshop face swap trick. Keep reading!
1#. Professional/Personal Use:
Using Photoshop tools, anyone can swap faces for personal or professional reasons.
People who learn how to use Photoshop's tools often try out different ways to use it.
So, they often try face swaps to improve their Photoshop skills when editing faces.
2#. Usage for Business Purposes:
Different types of photo editing are used in the business world for different reasons. It could be advertising, marketing, getting more people to watch, etc.
Face-swapped business photos are usually meant for many people, so by using the face-swap Photoshop strategy, they must be well-edited and free of apparent mistakes.
3#. E-commerce sites and stores:
The e-commerce business is vast, and many different things happen in it.
Face swap images are used by people who run e-commerce sites to get customers' attention.
One of the most common things you'll see in both online and offline stores is the use of pictures with the faces of famous people.
All of these photos are modified with the face swap Photoshop trick.
4#. Magazine or Advertisement Companies:
The faces are often switched on the giant banners you see on the streets.
With the help of the face swap Photoshop technique, many Ad agencies often put one person's face on another's body to modify how the model looks and how objects are shown in the photo.
Magazines and other publication agencies do the same thing like using the face swap Photoshop way.
Some of the photos you see of beautiful models may be of more than one person.
5#. Selling Any Product:
Face swapping can sometimes mean switching out parts of the face or the whole face.
A lot of people are editing product photos with the face swap Photoshop method.
It makes a photo look different by letting you cut out and replace stickers, seals, logos, and other things.
6#. Posters & Banners:
The most frequent reason for doing it on posters and billboards is that it is quicker and lowers the cost of photo shooting.
They can also be used to make copies of the original banners and posters that are fun to look at.
Final Thoughts For Face Swap Photoshop CC:
Learning the face swap Photoshop procedure can be challenging if you're just starting.
With enough experience, you can improve your photo editing abilities and try out some problematic photographs to excel in your skills.
Now you can start using Photoshop face swap to make various adjustments to your images to make them appear more natural.
To improve the quality, you can edit it. This face swap Photoshop technique helps you manage work of any size and quality.
You can now edit your photo in any way you like, and you can experiment with various settings to better understand what to do in various scenarios.
Your confidence will grow as you use Photoshop more and learn more about its new features.
Applying the face swap Photoshop strategy to your future projects will require lots of practice and mastery.
If you need a high-quality and professional photo editing service for your e-business, feel free to ask CMA (Clipping Mask Asia) because we're also experts in photo retouching services.
Have any question? Please leave your comment below. Thanks for reading.
Asha is working as a Creative Director at Clipping Mask Asia. She has completed her Graduation from the University of Dhaka inFilm and Television Studies. She has vast knowledge in Photography, Videography, Video Editing, 3D Modeling, Rendering and Animation. She loves to explore the creative world with her academic knowledge, experience and creative mind. She writes creative blogs on design, illustration and editing for renowned brands like Clipping Mask Asia.