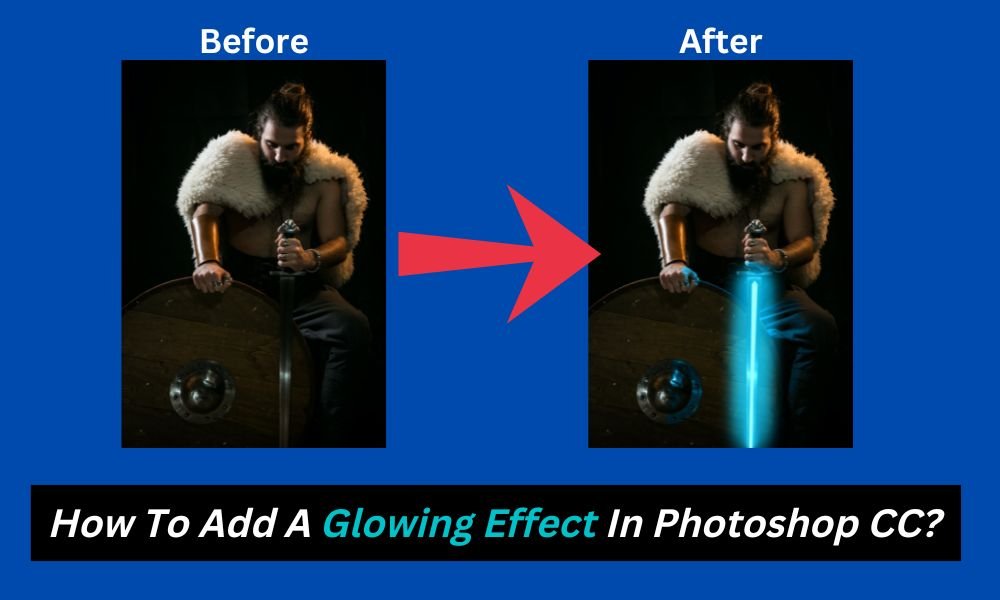
It's great fun to create a special growing effect in Photoshop, and the results will be incredible photographs. Sometimes a unique glow effect makes anything appear great. You can create this amazing effect with a little practice and effort.
However, the glowing light effect Photoshop is surprisingly customizable. You can paint a touchy or dreamlike portrait. There are countless ways to enhance your photos. How simple it is can surprise you once you've learned the tricks.
This tutorial will demonstrate how to apply or add a glowing effect in Photoshop. Let's begin immediately.
How To Add A Glowing Effect In Photoshop CC?
Before reading this tutorial, there are some key things to remember. Those factors are your overall idea or concept, what type of growing effect you want to apply to your image, extensive research to get your desired image, composition, and photo editing tasks.
Now it's time to move forward. Please take a quick look at the photo I'm using for this blog post. It's a simple and well-composed portrait of a man sitting with his armor and sword.
But there is little of an eye-catching effect or specialty in this image. By adding some inner-glow Photoshop effects, this picture will be mind-blowing.
It's all about Photoshop magic. Let's see how versatile the glowing effect in Photoshop will excel your photo to the next level. Start reading now!
Step#1.
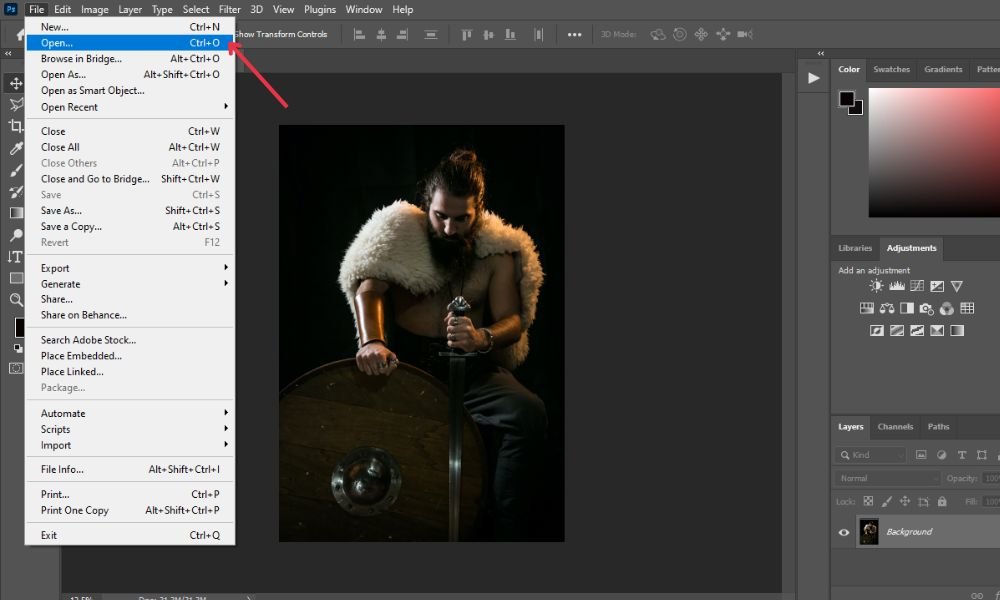
Open your latest version of Photoshop CC on your PC or laptop. Then, at the top of the Photoshop toolbar, select 'File' and then 'Open,' or press 'Ctrl+ O.' Open your desired image file.
Step#2.
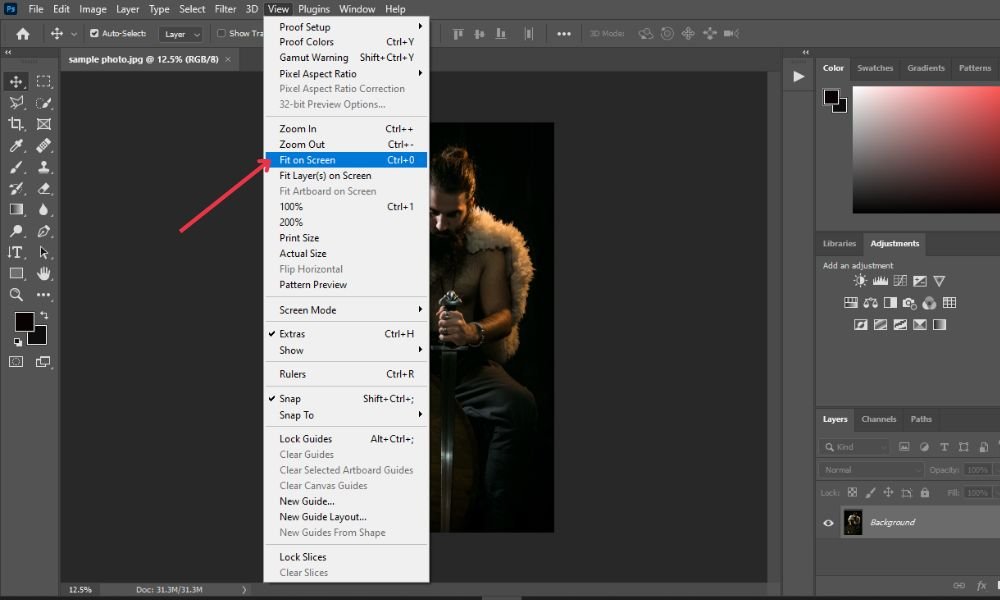
Now, click on the 'View' option and select 'Fit on Screen' from the drop-down menu. Your image will be centered on the screen automatically. Look at the below image.
Step#3.
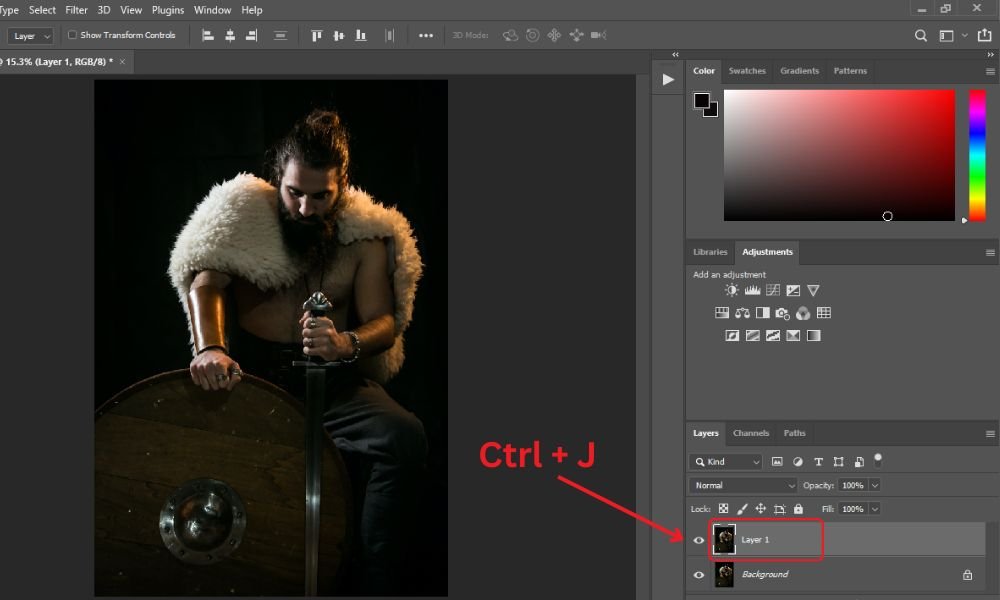
After fitting the photo on screen, then press Ctrl + J. Another new layer named 'Layer 1' will be created under the layers panel.
Step#4.
Now, press Ctrl + the Plus icon (+) to zoom in on your photo, or click on the ‘Zoom In’/ ‘Zoom Out’ symbol, which is located on the left side of your Photoshop toolbar. Taping some space on your keyboard will center the image.
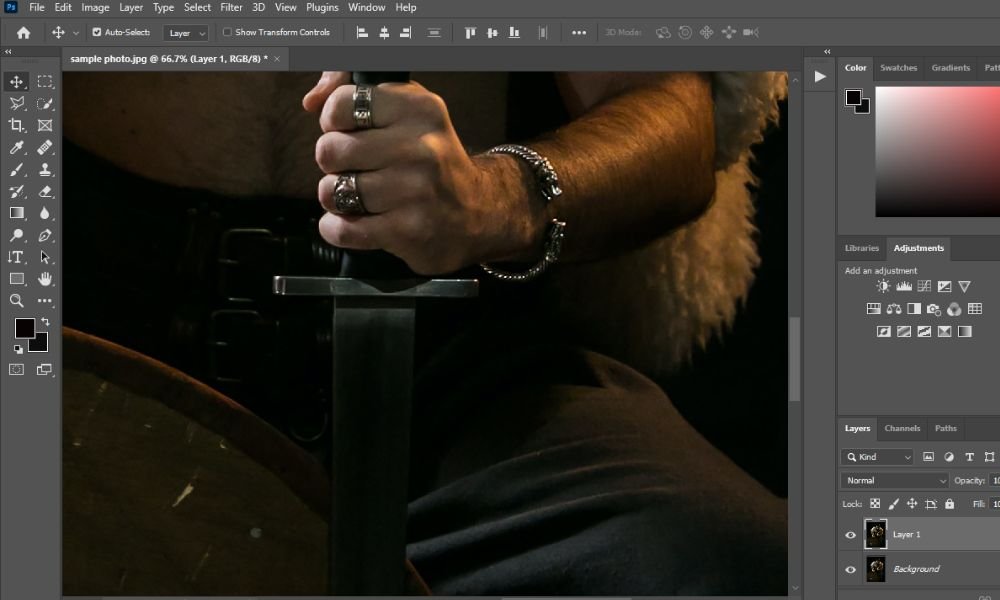
Step#5.
Now, select the 'Polygonal Lasso Tool' under 'Lasso Tool' to do the rest of the things.
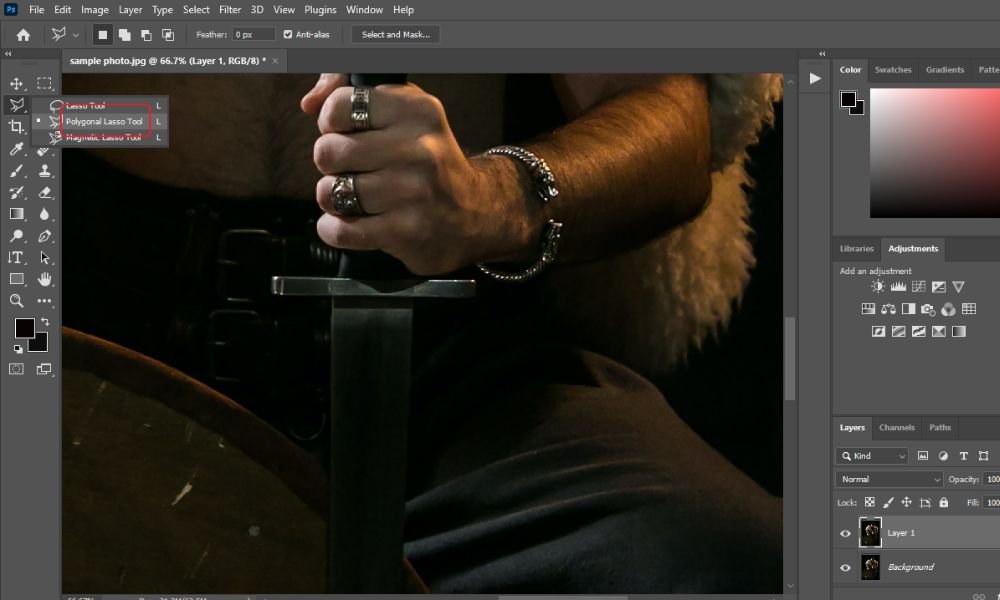
Step#6.
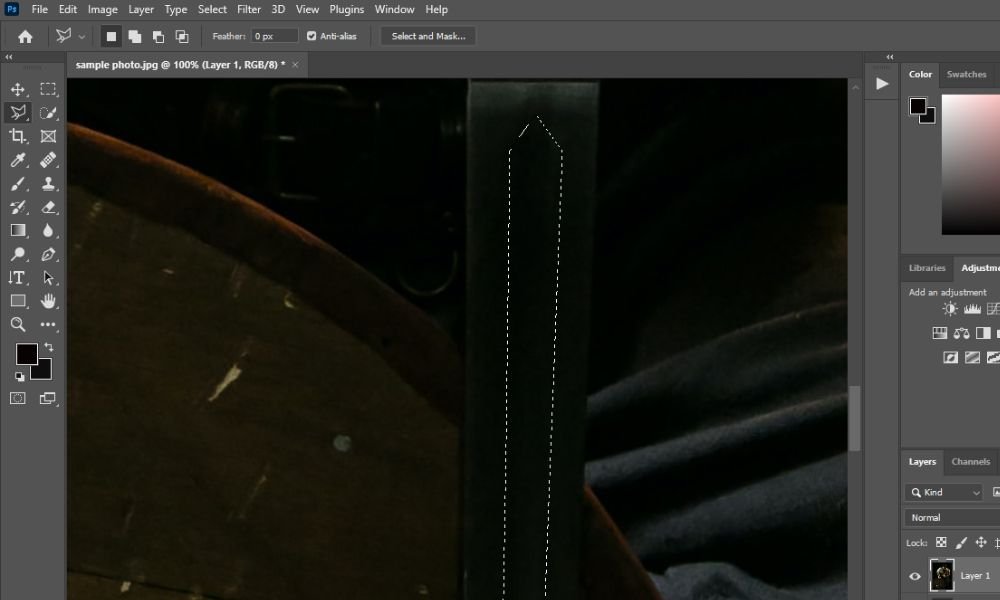
In this stage, make some line scratches on the object (the sword) with the 'Polygonal Lasso Tool'.
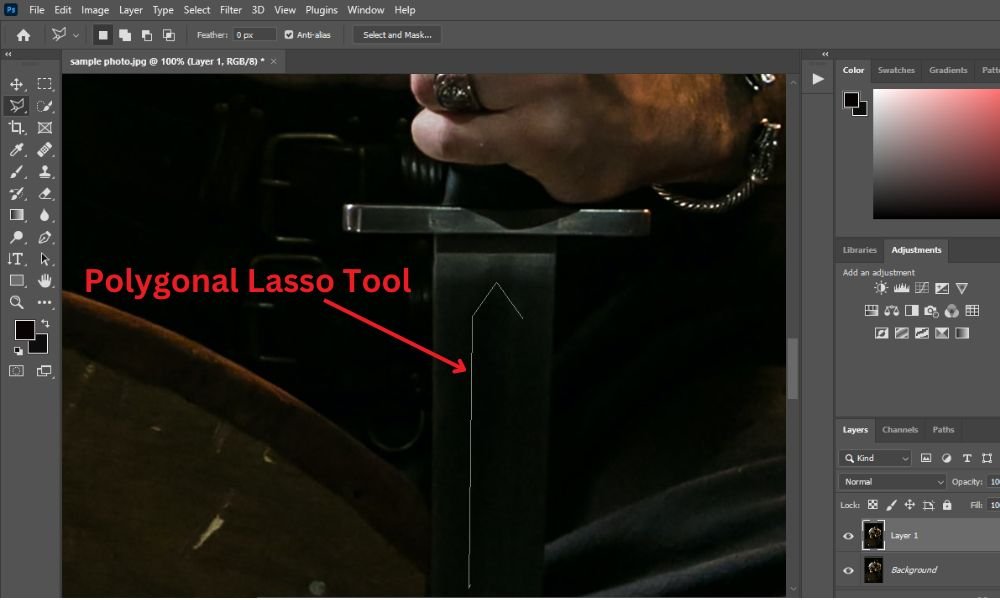
Here, you have to do this task more carefully.
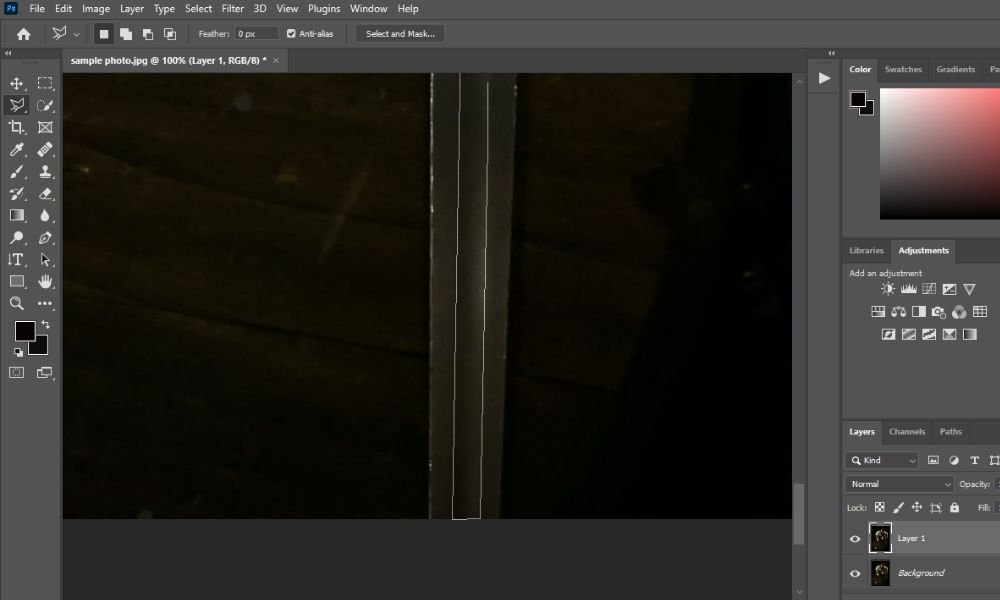
Continue doing this until you reach the end and intersect with the first and last points.
Step#7.
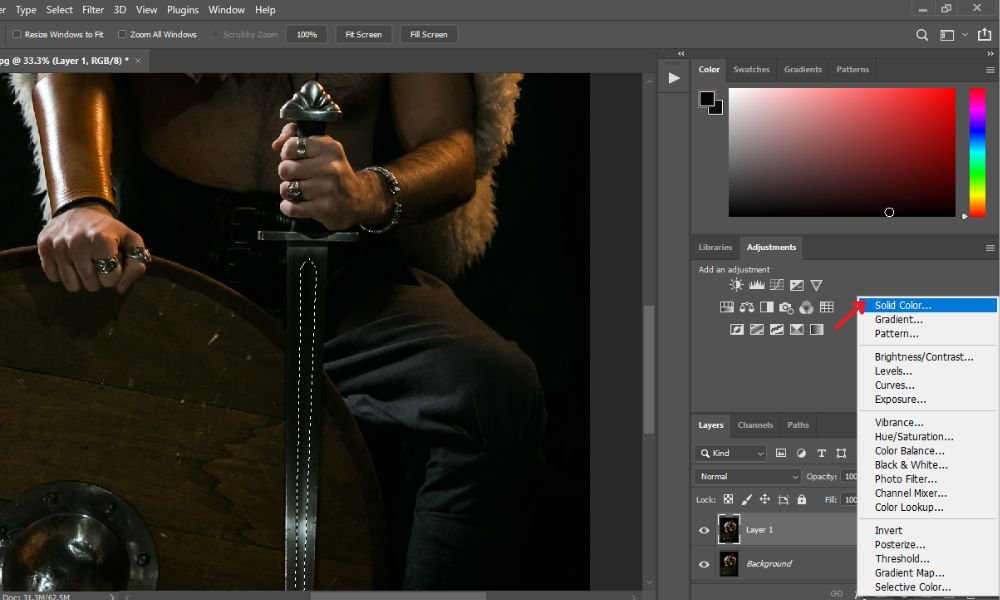
Simply zoom out to see how the scratch looks on the whole object (the sword). Now, activate layer 1 and click on 'Adjustment Layer,' located on the right side of the below icon under the 'Layers Panel.' A new pop-up window will appear; select the 'Solid Color' option.
After clicking on the 'Solid Color' option, a new window will come up named 'Color Picker (Solid Color).' Then select 'New' and choose your desired growing colour effect from the color box. Press the 'OK' button.
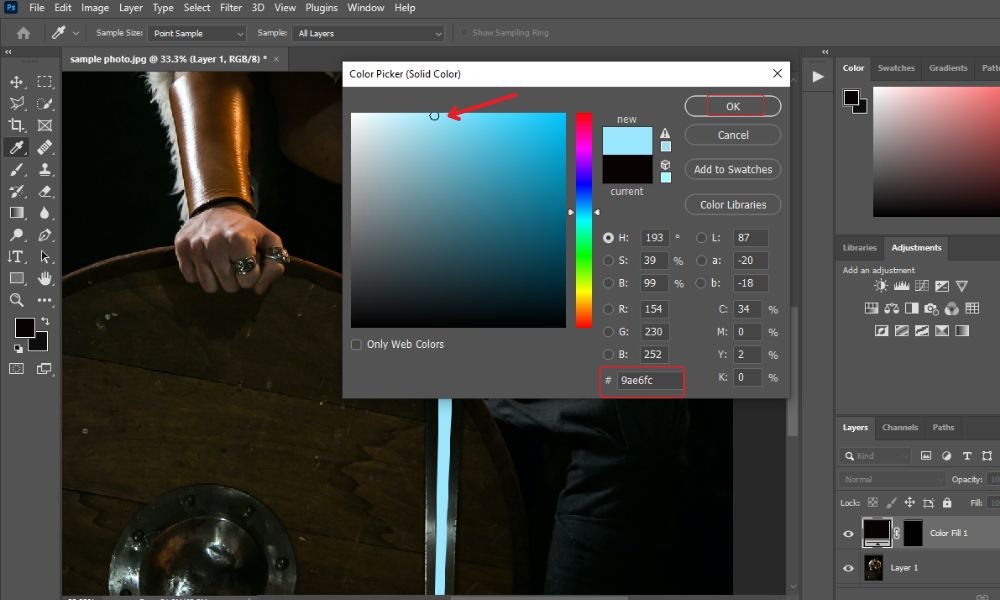
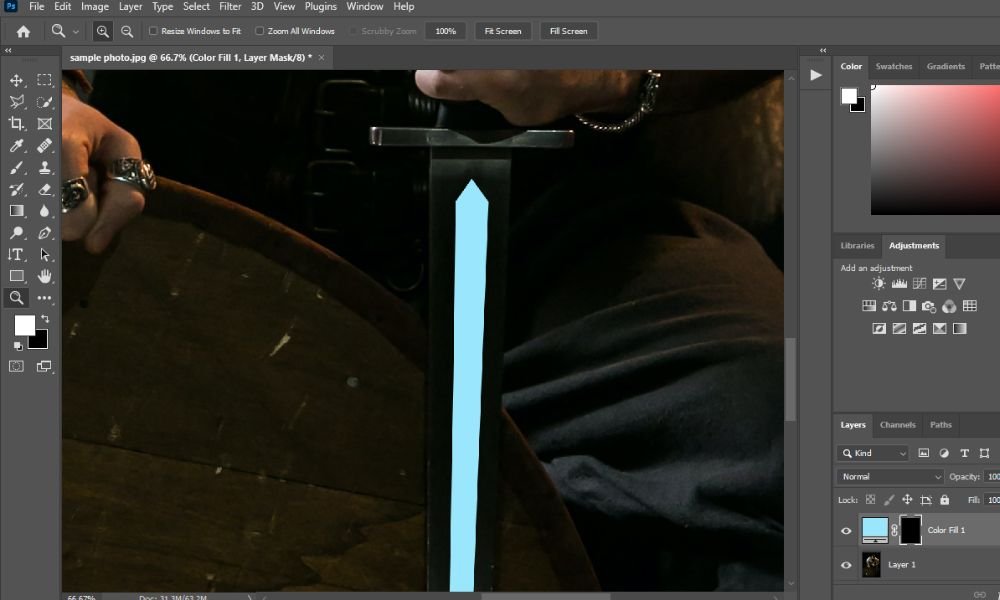
Just look at your selected colour. It's amazing!
Step#8.
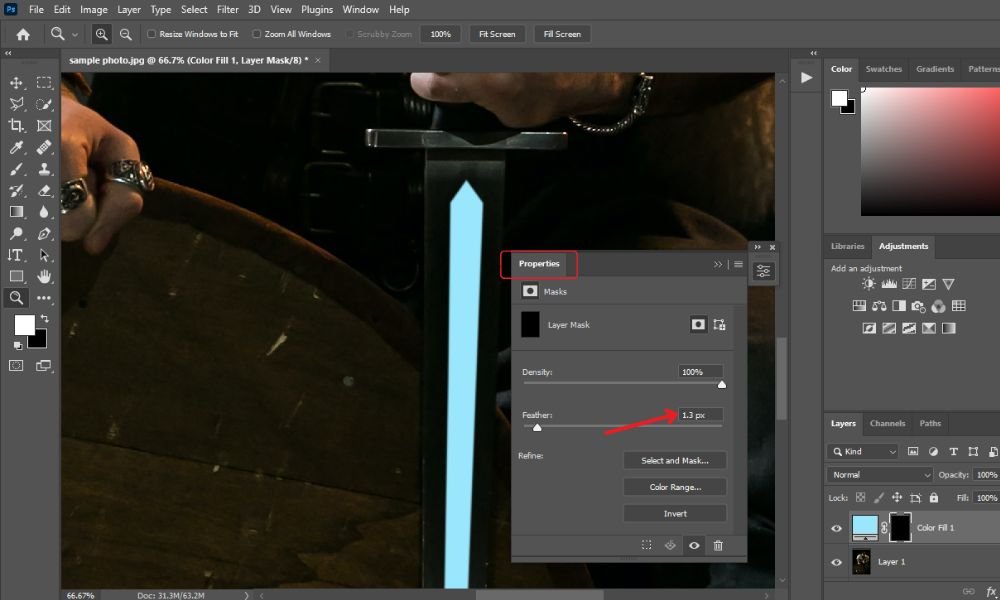
Now, double-click on the 'black' Color Fill 1 layer. A new window will appear named 'Properties.' Then scale the feather (1.3 px), and the density will be 100%.
Step#9.
Now, click on the 'blue' Color Fill 1 layer. Then right-click on the 'Adjustment Layer.' A new pop-up window will appear; select 'Solid Color' from there.
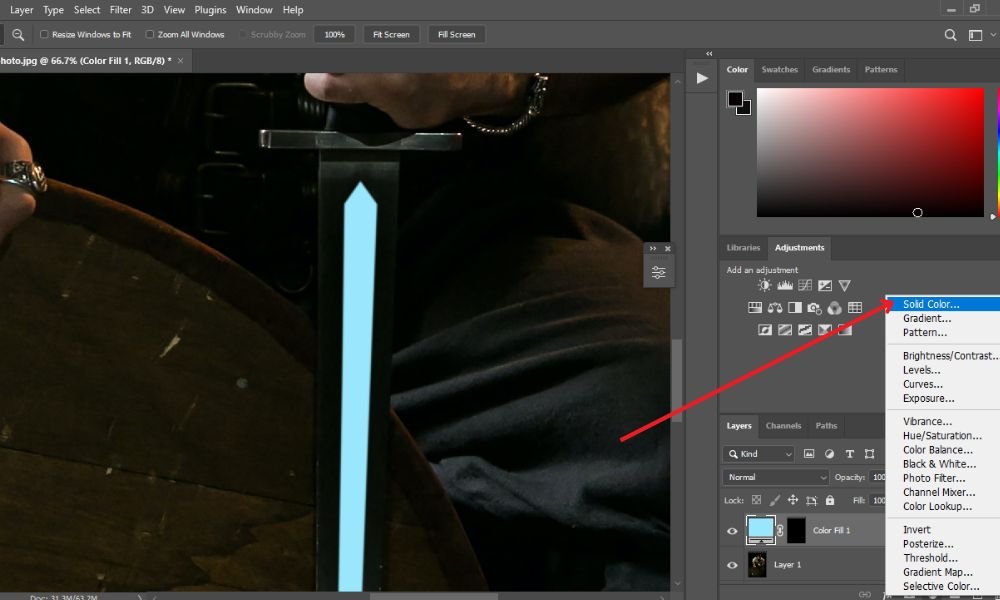
After clicking on 'Solid Color,' another new layer named 'Color Fill 2' will be created. Also, you will see a new window named 'Color Picker (Solid Color)' appearing. Now, first, select 'New' and choose your desired colour from the color box. Then click the 'OK' button.
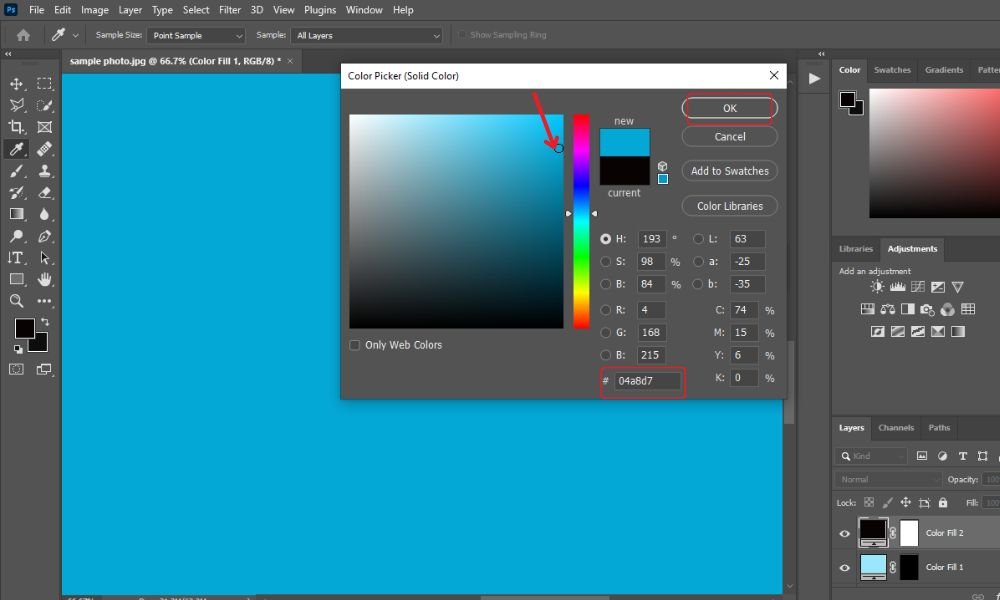
See the color that you have selected. Double-click on the 'Blue Color Fill 2 Layer.'
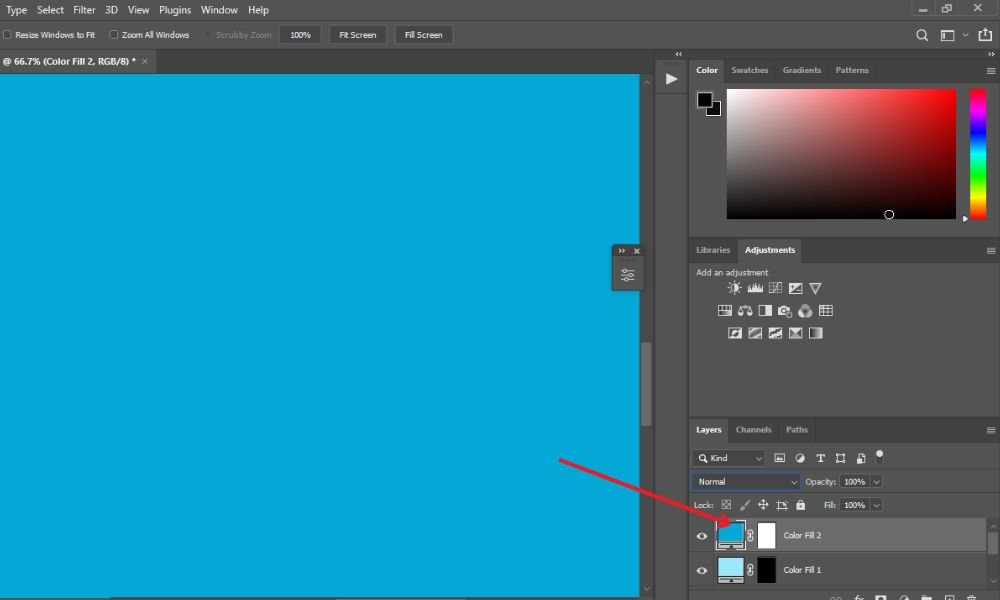
After double-clicking on that layer, choose the 'Linear Dodge (Add)' option from the drop-down menu.
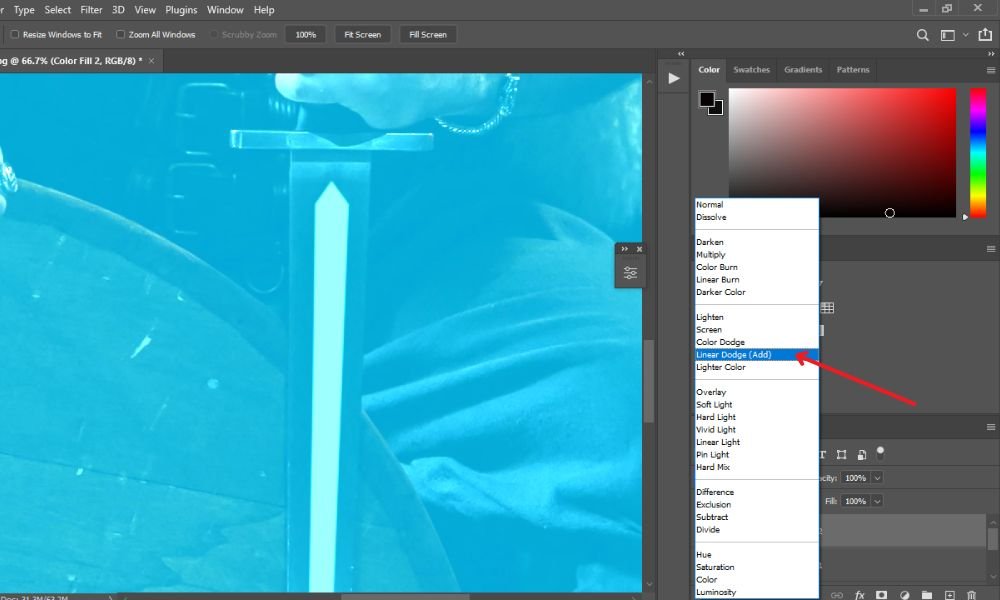
Look at the linear dodge. Now, double-click on the 'White' Color Fill 2 Layer. A new window will appear named 'Properties'.
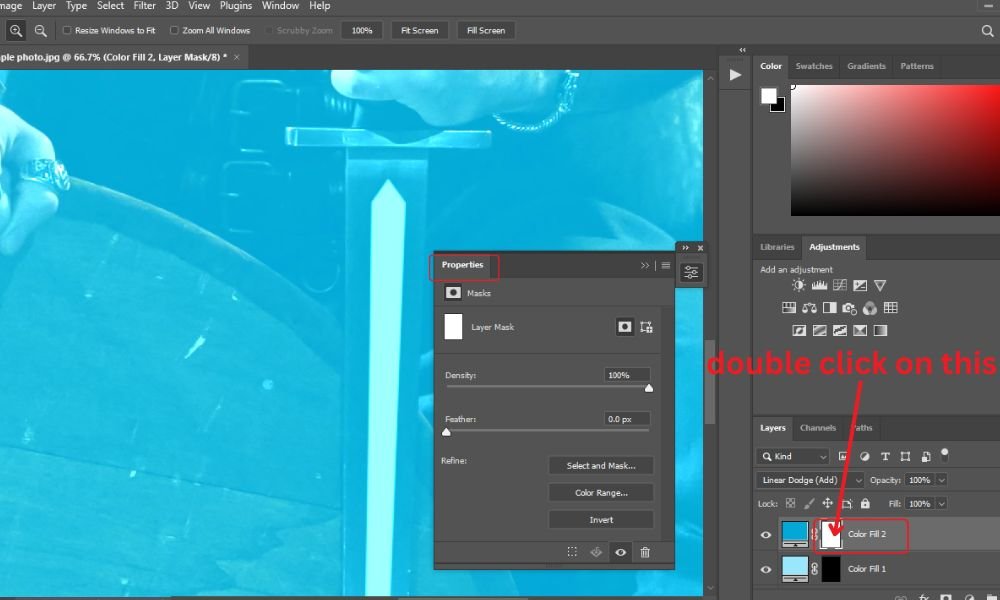
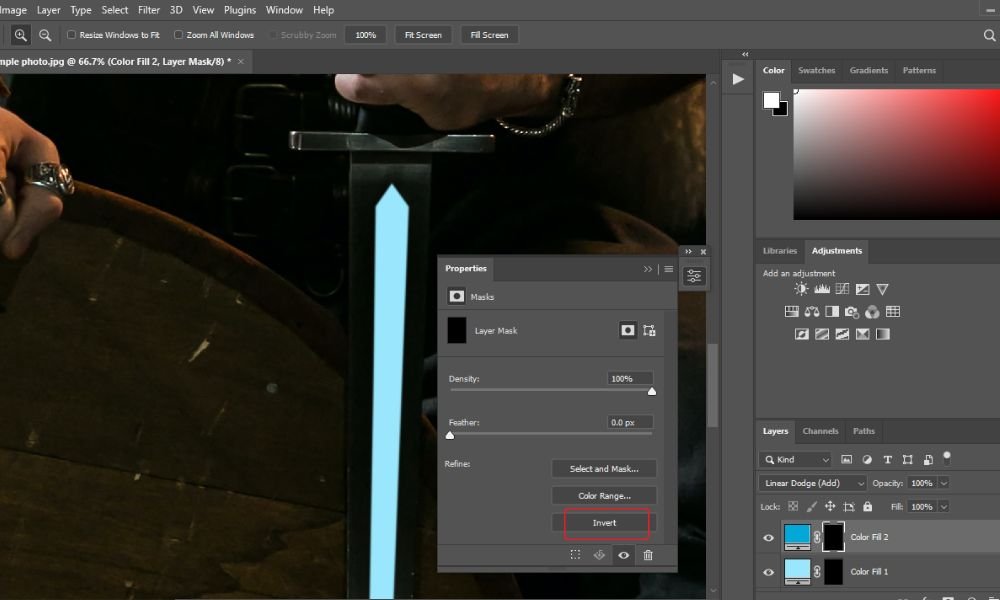
Now, select the 'Invert' option from the properties box. You will see that the linear dodge color will disappear automatically.
Step#10.
Now, select the 'Brush Tool' from the left-side Photoshop toolbar.
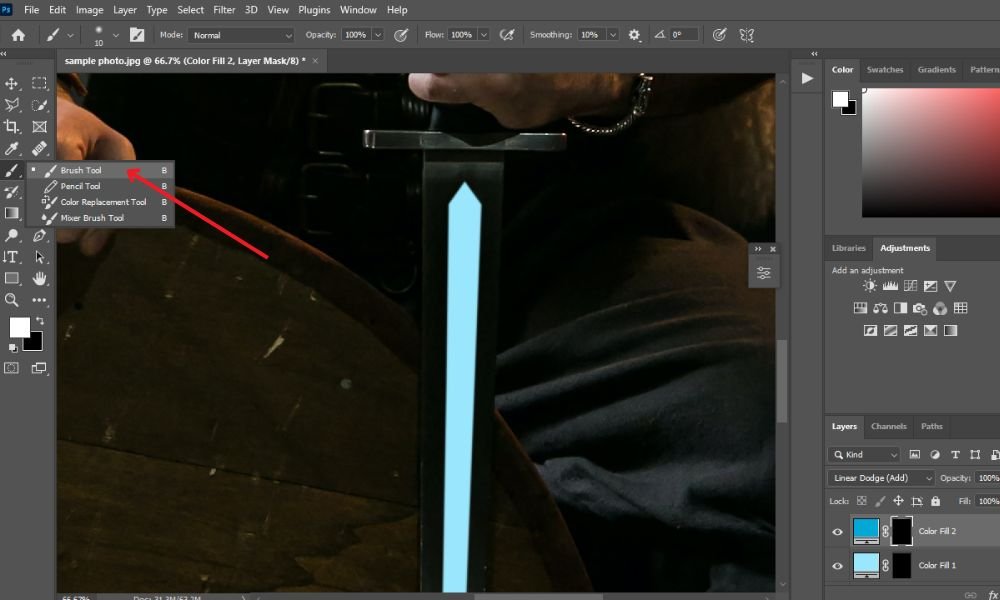
Now, right-click on the brush tool and choose your brush size (152 pixels).
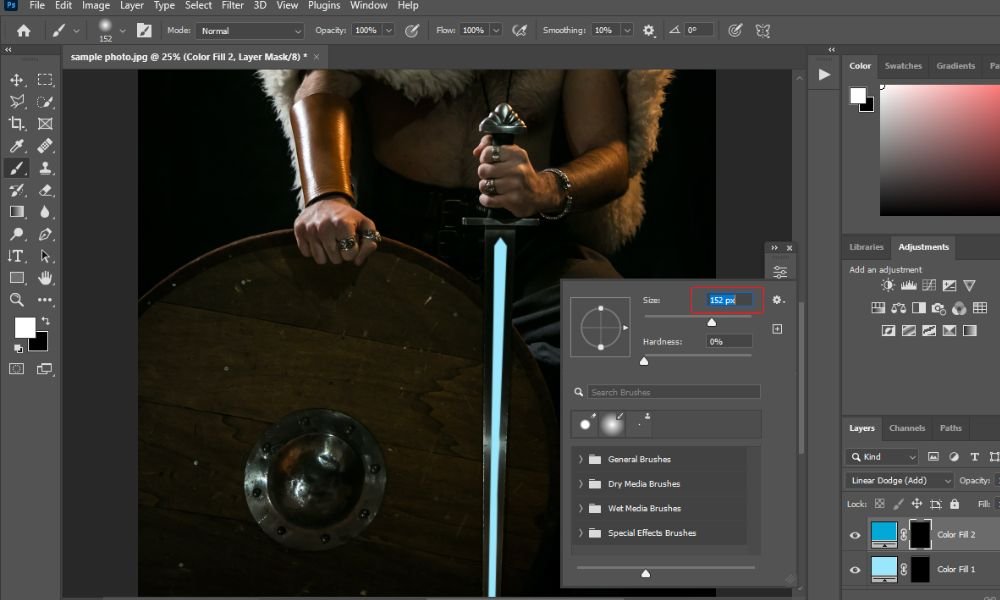
Paint with the brush tool on the object (the sword). It'll have a growing effect on your photo.
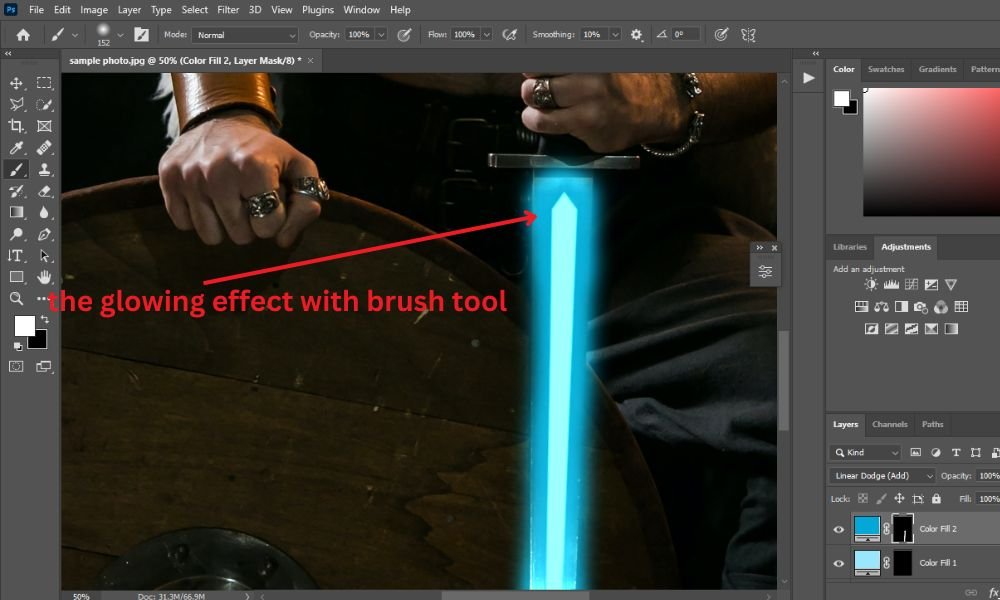
Keep going to add glow in Photoshop until the end. It looks mind-blowing in the end!
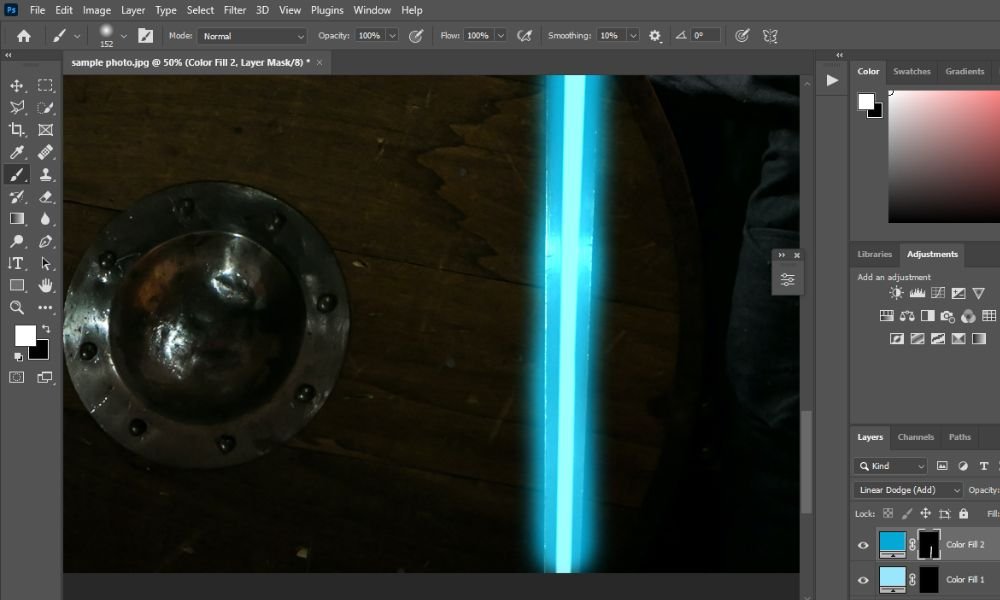
Step#11.
Again, right-click on the brush tool and choose your brush's size (for example- 435 px) to create a larger growing effect on the photo.
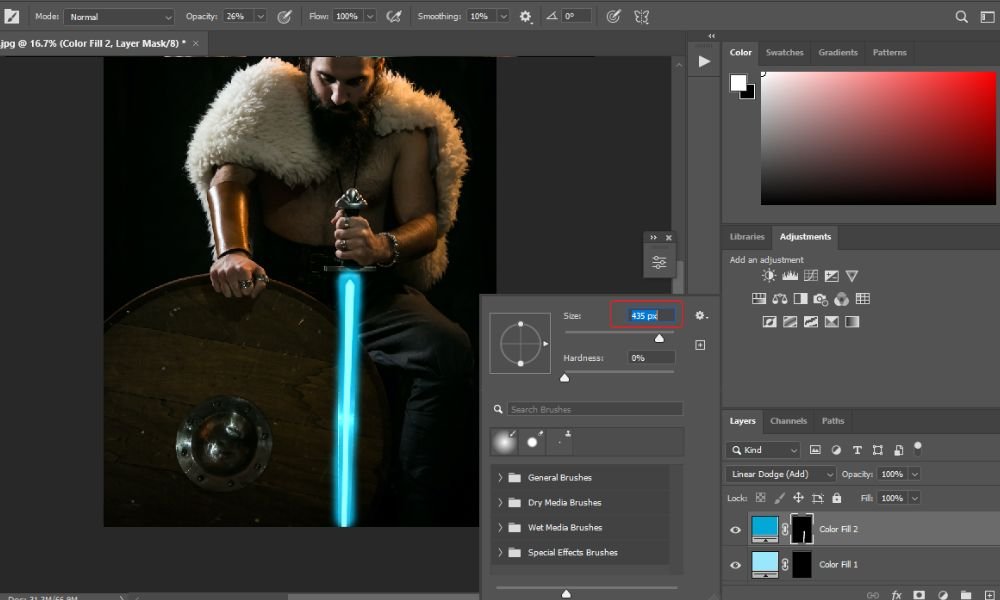
Depending on the photo, edit the opacity, flow, and smoothing criteria. Here, I set the opacity level to 26%, flow to 100%, and smoothing to 10%. Paint with the brush tool (435 px) on the object (sword) and see the magic.
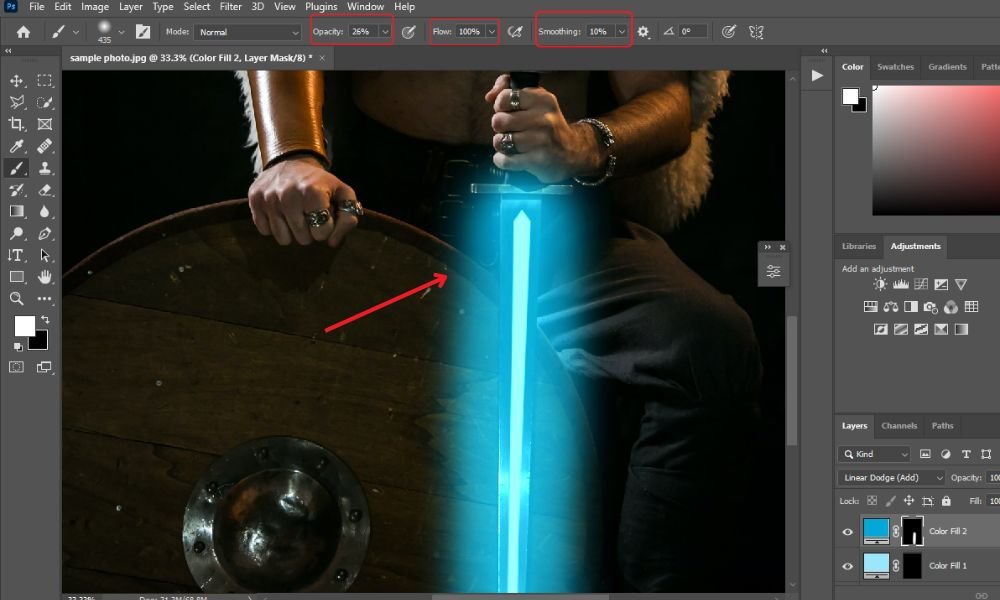
Keep going to add the glowing effects on the object (Sword).
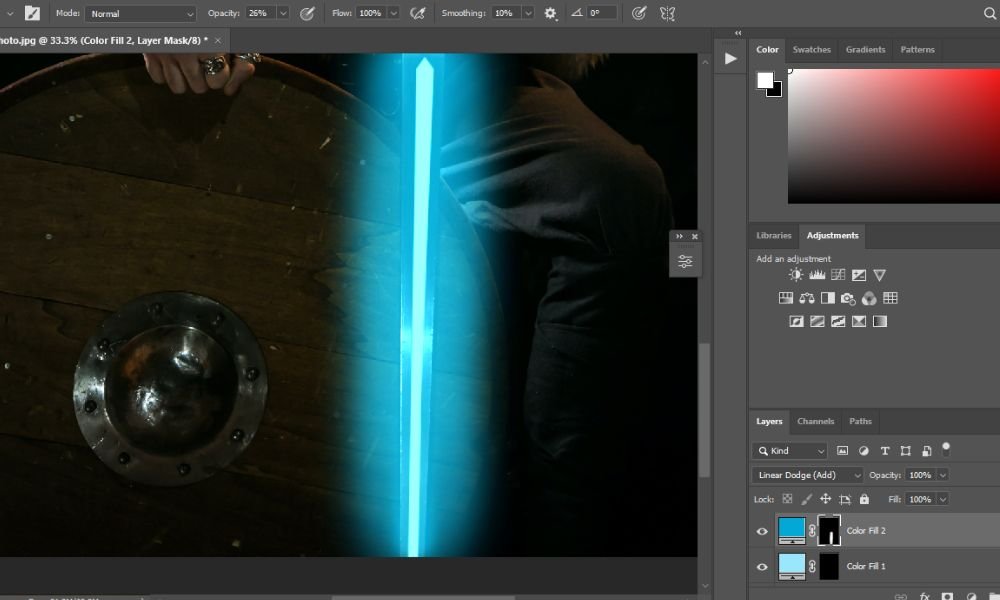
Step#12.
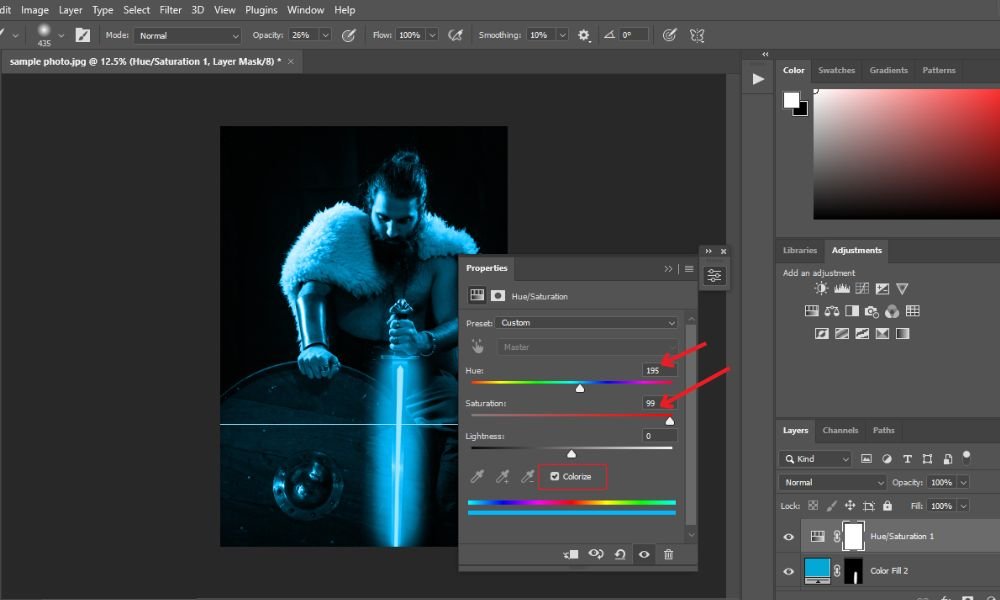
See the photo by zooming out. Active the Color Fill 2. Click on the below adjustment icon and select 'Hue/Saturation' from the drop-down menu.
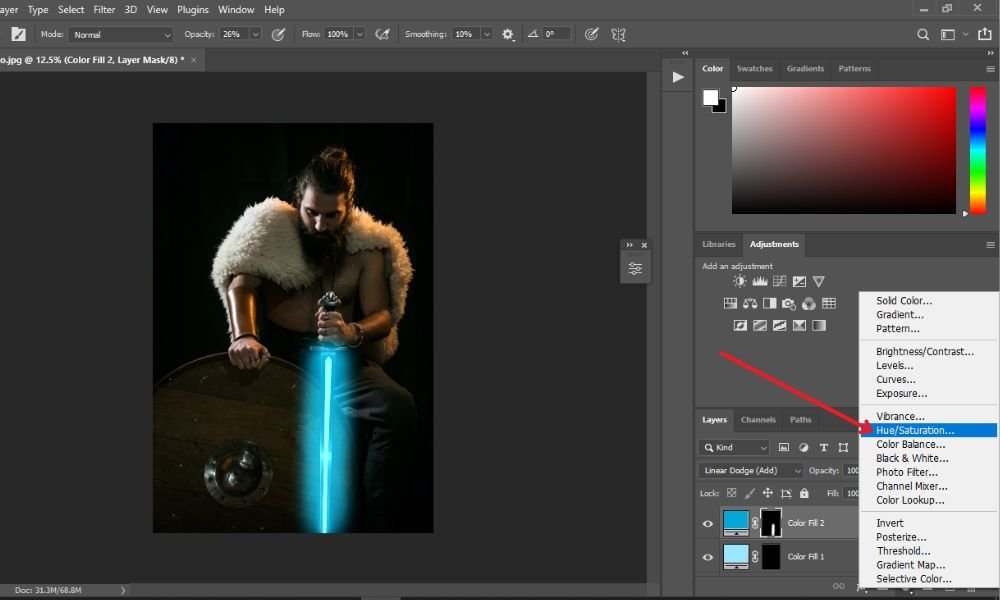
After choosing the 'Hue/Saturation' option, a new layer (Hue/Saturation 1) will be created under the 'layers panel.' Also, a new window will come named 'Properties'.
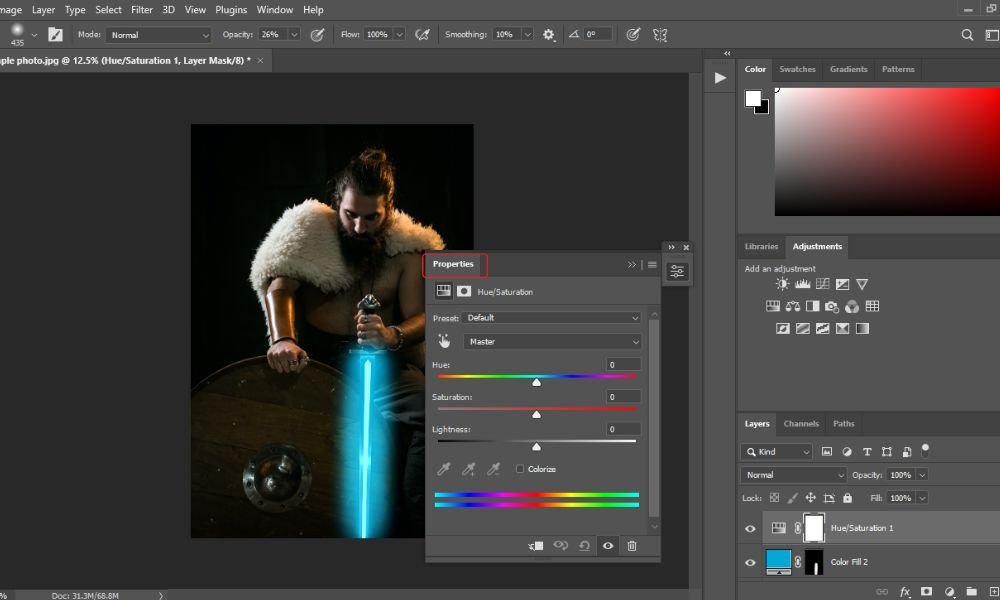
In the properties box, mark 'Colorize' and then select some levels, including hue, saturation, and lightness. Here, I scaled hue to 195, saturation to 99, and lightness to 0. Then minimize or close the box.
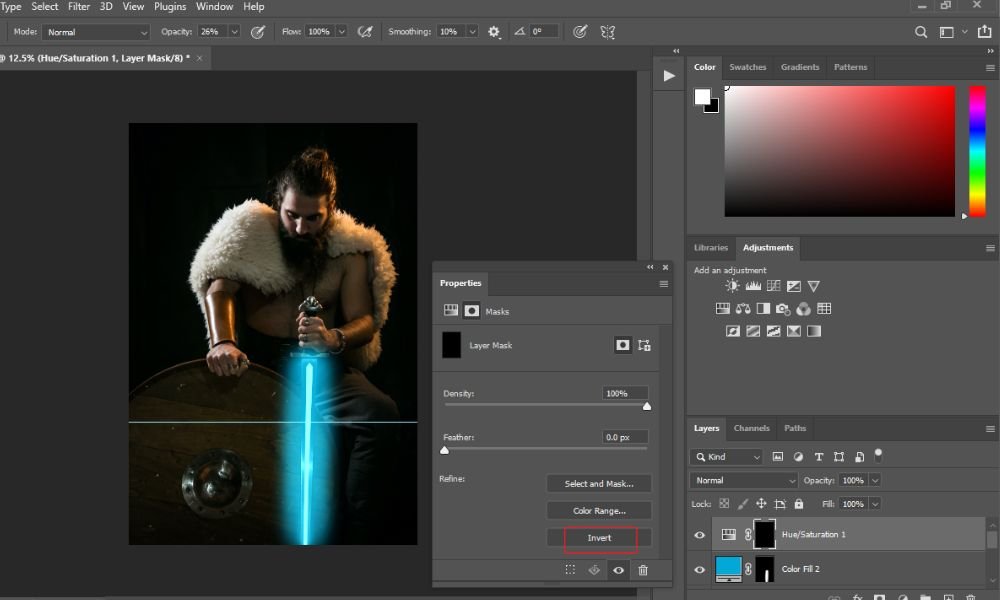
Now, double-click on the 'black' hue/Saturation 1 layer. The properties box will come and hit on the 'Invert' option. See the magic!
Step#13.
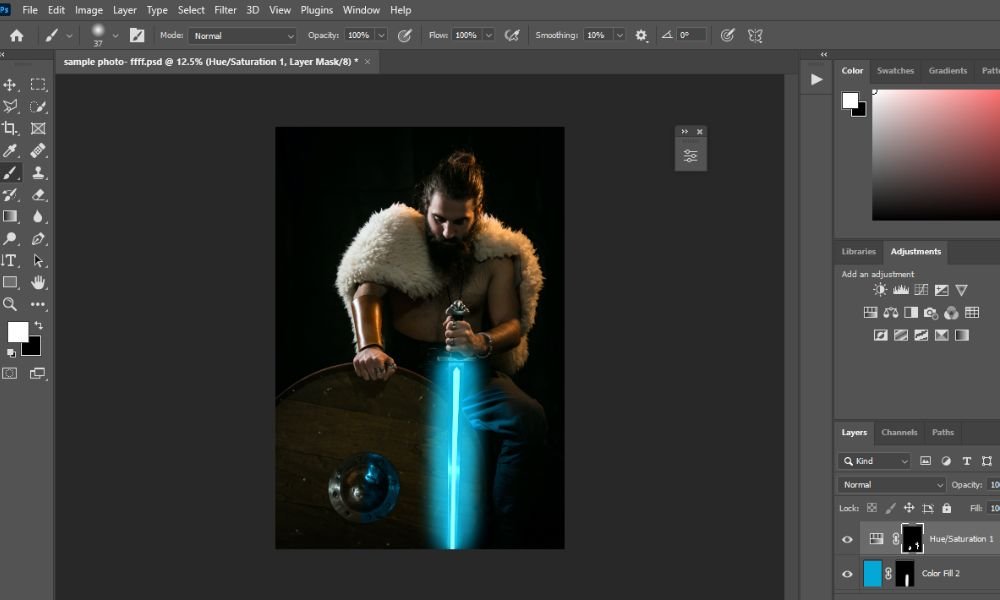
In this stage, scale up the brush tool's size (for example, to 37 px) to give some reflections on the subject (the man).
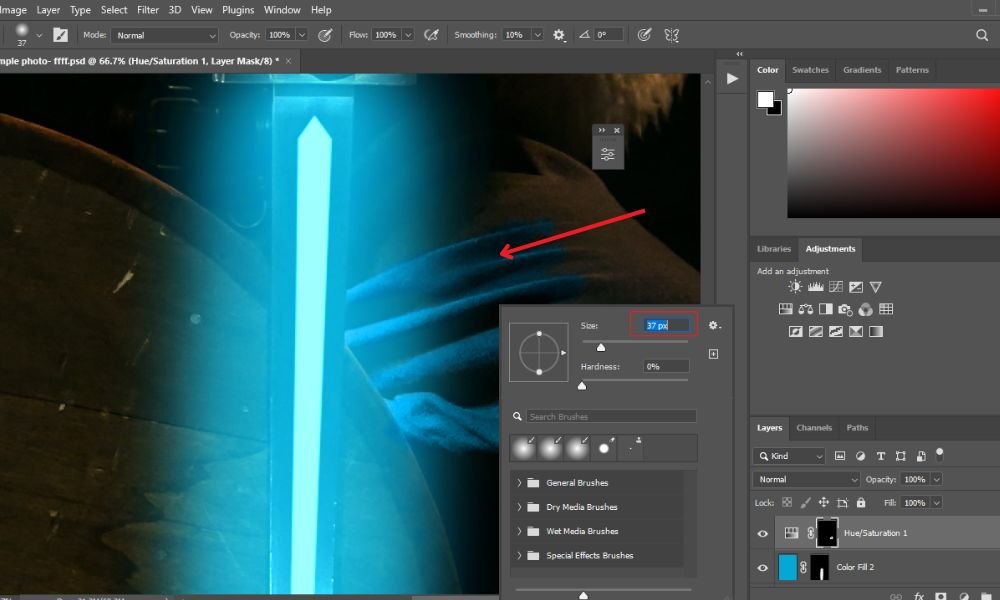
Continue with your reflections on the subject with the brush tool. Do it very carefully.
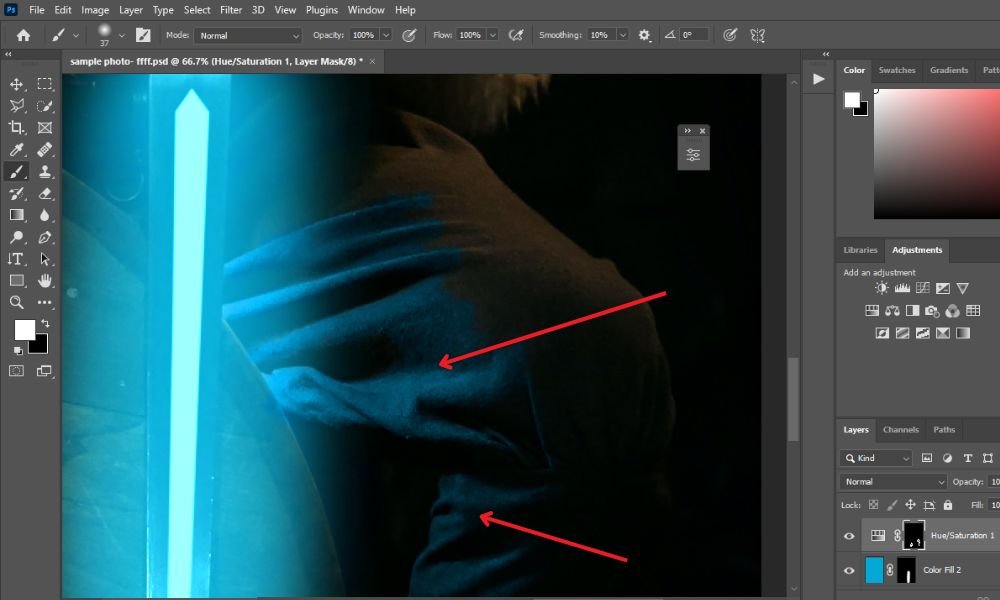
Do the same thing as in the below photo.
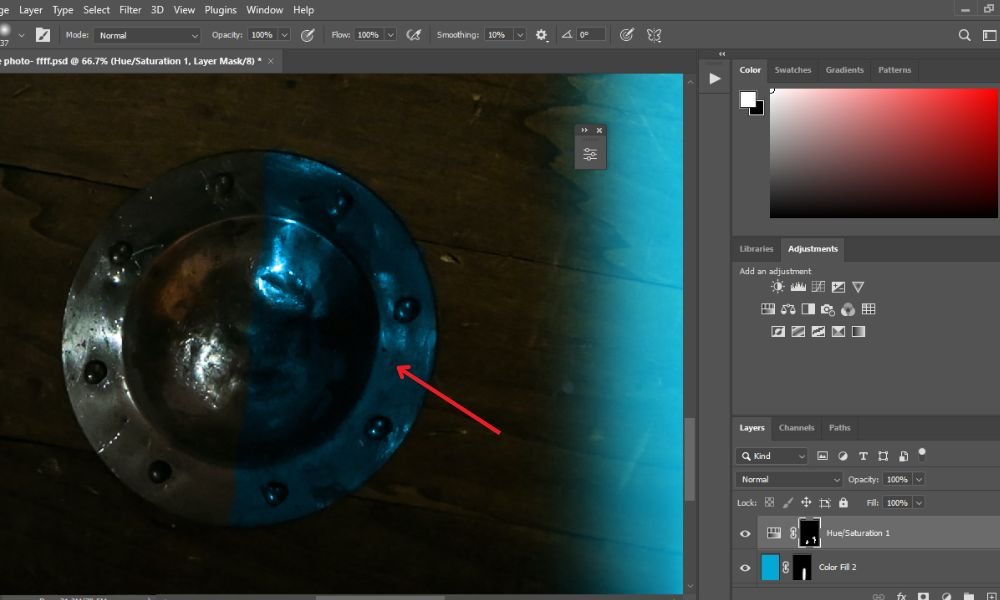
Zooming out and examining the reflections on the subject (the man) and object (the Armor).
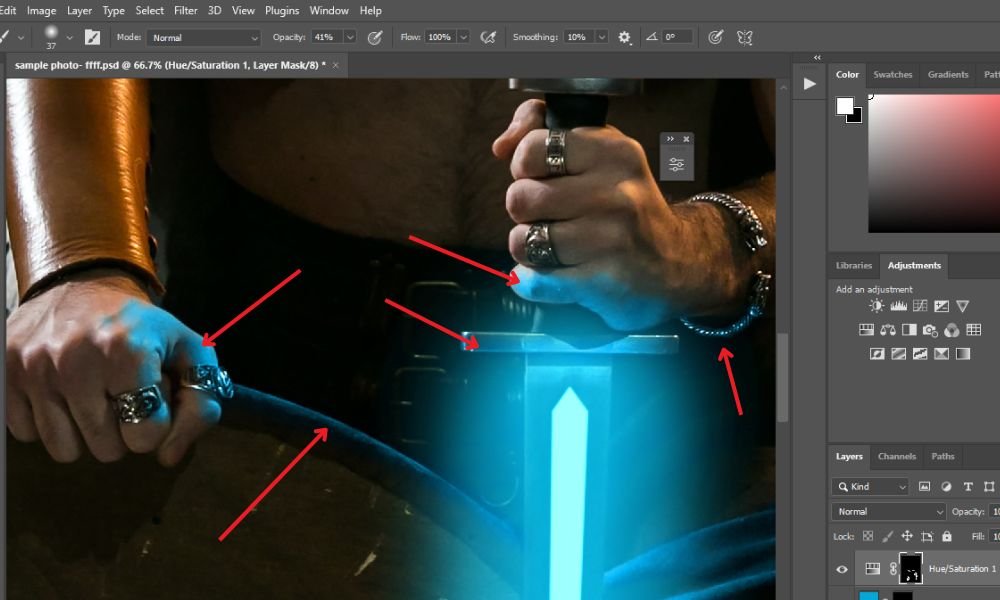
Now, give some reflections by painting on the subject (man's fingers), the object (corner of the Armor), another object (upper side of the sword), and the last object (front side of the baslet). Do this task appropriately.
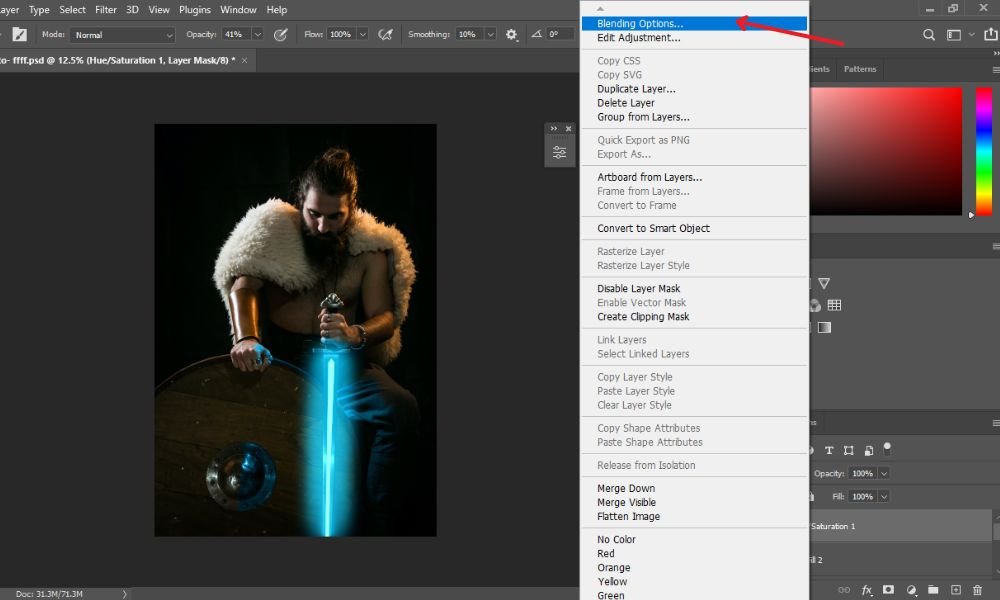
Step#14.
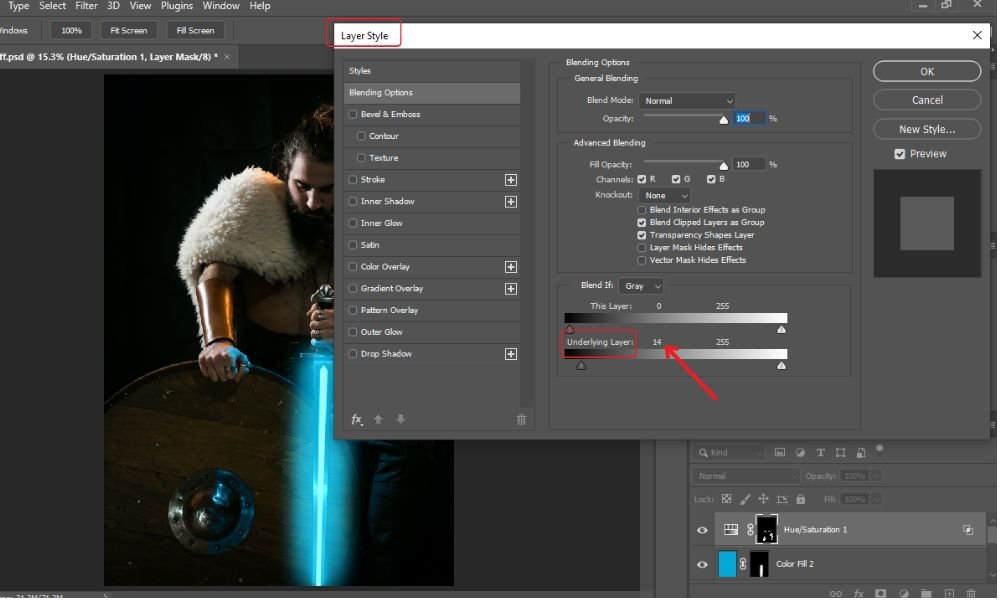
Zooming out the photo. Double-click on the 'Sue/Saturation 1 layer' and select 'Blending Options' from the up-down menu.
Step#15.
After clicking on the blending options, a new window will appear named 'Layer Style.' Scale the 'underlying layer' as needed. Hence, I scaled the underlying layer to 14, with the opacity set to 100% to fulfil my photo's requirement.
Step#16.
Here is the final Photoshop growing effect on your photo. The desired output is given below. Congratulations! You've done it successfully.
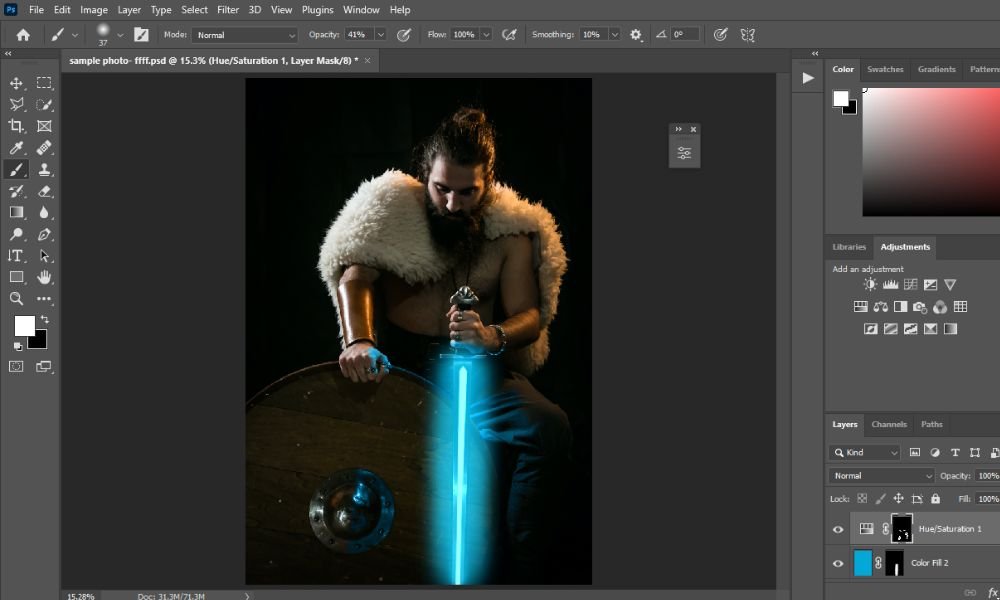
All of the layers we've made can be modified whenever you like. You'll decide how far to add the glow brushes Photoshop effects to your photo. It's up to you.
Key Recommendations For Glowing Effect In Photoshop:
(1). Whether making a special glowing effect in Photoshop CC or blending several photographs, a little color grading on top can go a long way toward connecting the final photo.
(2). You can get a better color grade quickly and easily by using a Color Balance & Adjustment Layer to push and tweak the colors in a photo until you're happy with the result.
(3). Many Photoshop tutorials will show you how to add a glowing effect to an object or subject. But they will also warn you not to go overboard; otherwise, your work will appear tasteless.
An overly glowing effect on your photo may look unnatural. So you should use this glowing effect wisely if you want the best possible results. Color balancing is key.
Final Words About Glowing Effect In Photoshop:
In a nutshell, I hope you enjoyed the Photoshop tutorial and learned how simple it is to make the glowing effect in Photoshop. Even if the tutorial has a lot of steps, it's easy to add many visual elements once you know how the basic process works.
Remember that creating a special glowing effect has never been simpler! You can create light, mood, and power with just a few layers and little preparation. You can change it up if you'd like by using dark blues, greens, or even gold!
There are countless possibilities and variations for Photoshop glow effects. Perfect practice makes you perfect.
To read the latest photoshop tutorials, visit our photo editing blogs. Happy Learning!