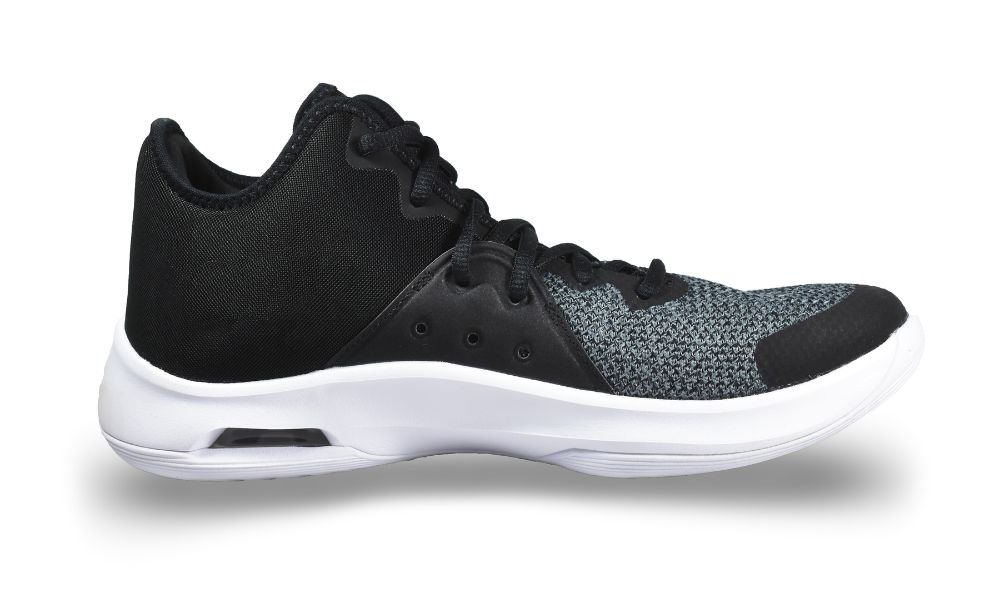
It can be tough for product photographers to connect customers emotionally with their images. So, learning how to add drop shadow in Photoshop will put you far ahead of the game.
A good product photo has a variety of qualities like appealing colors and lighting, distinct features, great compositions, etc. By adding drop shadow you can give a photograph a natural look.
The drop shadow effect will draw readers' attention and give your photo a real touch. Customers can easily connect these product images with their daily lives. It increases the visibility of the photographs and generates more future sales.
This article will discuss drop shadows, how to add a drop shadow in Photoshop CC, and much more. To know more, start reading now! Happy learning!
What Is Drop Shadow?
Drop shadow, also called 'natural shadow,' is an effect that makes an object's more natural by creating real connection with the background.
Most of the time, this virtual effect is used in business cinematography. There are mainly two types of shadows. Such as-
- Form Shadow
- Cast Shadow
A form shadow is one that is cast on an object. But the cast shadow is made by the element or object, not on the item or object itself. A cast shadow is usually made on the surface.
A drop shadow is a cast shadow that is made with advanced software like Photoshop CC after the image has been taken. It's placed at the bottom of the item or object. It provides information about the space around the object and gives it a 3D (three-dimensional) appearance.
Why Should You Use the Drop Shadow Effect on Your Product Photos?
When the shadow in the original picture isn't strong enough, we have to add a drop shadow. It usually happens when taking pictures in a photo studio.
A product photo on a plain or simple background generally doesn't draw people's attention. Most of the time, it's because people don't like it. So, learning to add a drop shadow in Photoshop CC can make this situation different.
That said, a flat background photo doesn't say anything about the space. When a product has a shadow, we know it is on the ground. Also, it shows the size of the product and provides a clear idea of how it fits into the digital world.
Remember that product images are one of the crucial factors or reasons people buy something. People rarely buy something just because it sounds good.
Customers generally look at the photo to determine the product's quality by looking at the color, texture, size, and shape. Also, it's important if you want customers to be engaged in the photo you post. When product photos are of a high standard, the brand is reliable.
The users need to see themselves in the photograph to realize why the product is important to them. After that, they'll feel like buying the product. Images that look natural and are visually appealing will eventually boost more sales.
Top 3 Benefits Of Adding Drop Shadow In Photoshop:
(1). Natural Image: Using a drop shadow provides your photograph a more natural appearance.
(2). Increase Professionalism: It matters why your image is more professionally produced than the competitors'.
(3). Enhance Quality: It's one of the proven methods for taking the quality of your product photos to the next level.
How to Add Drop Shadow in Photoshop CC? [Photoshop Tutorial]
Every product photographer must know how to add a drop shadow in Photoshop. Hence, Photoshop CC has a drop shadow tool that lets you put shadows on photos. When you click 'Layer' in the layer panel, you'll see an option called 'Layer Style.'
There you'll find the 'drop shadow' option, which lets you change things like the distance, the color of the shadow, and a lot more. People often use Photoshop's drop shadow effect because it's extremely easy.
But you can also do it by hand if you don't prefer to use Photoshop's tool. It's better because you can create custom drop shadows to fit your needs.
This method, which you can also call the 'duplication method,' will be explained in this blog post. Here, I'll show you step-by-step guidelines about how to add a drop shadow in Photoshop CC.
So, keep reading until the end of this tutorial.
Step #1. Open The Raw Image In Photoshop:
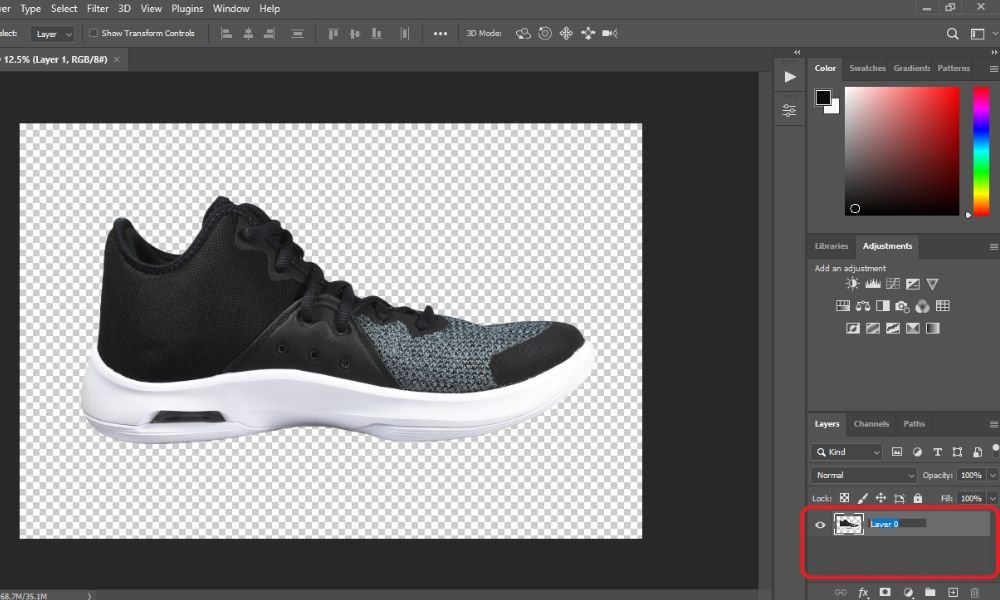
First, open up your latest version of Photoshop CC on your PC or laptop. Hence, I'm using Adobe Photoshop CC 2023 for tutorial purposes. Then, go to the 'File' tab on the above toolbar. Click on 'Open' and choose your raw image file. Make sure you've already removed the background from your image.
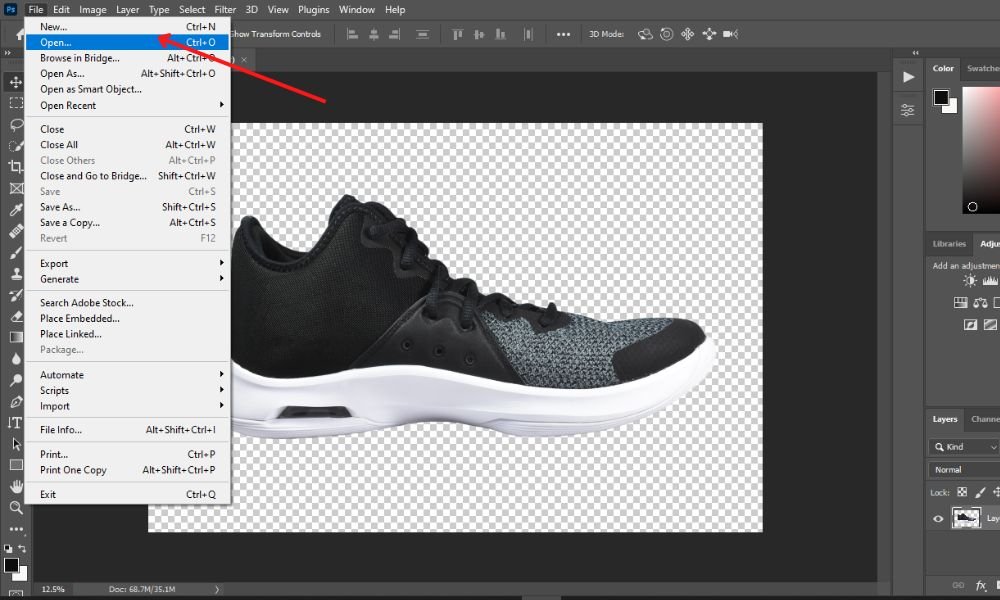
Next, rename the background layer to 'Layer O.'
Step #2. Create A White Color Layer:
After that, put a white layer under the background layer.
To add a white layer, go to the above menu bar and press Layer in the layers panel. Choose 'new fill layer' from the drop-down menu, and then choose a 'solid color.'
layer —> new fill layer—> solid color
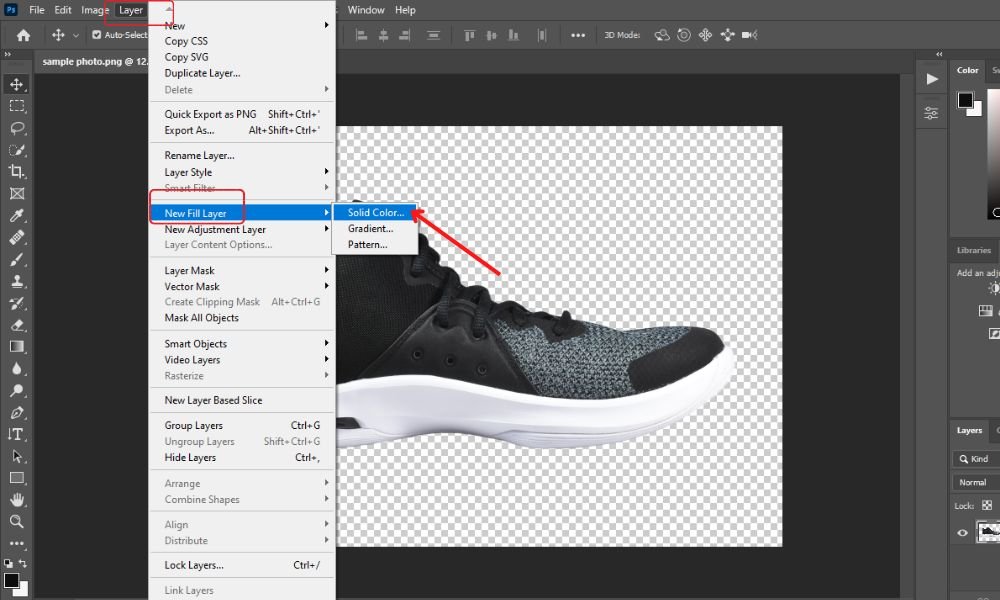
After clicking on the 'solid color,' a new pop-up will come up named 'New Layer.' The 'Color Fill 1' name box will automatically be created. Select 'normal mode,' scale opacity to 100%, and then press 'OK.'
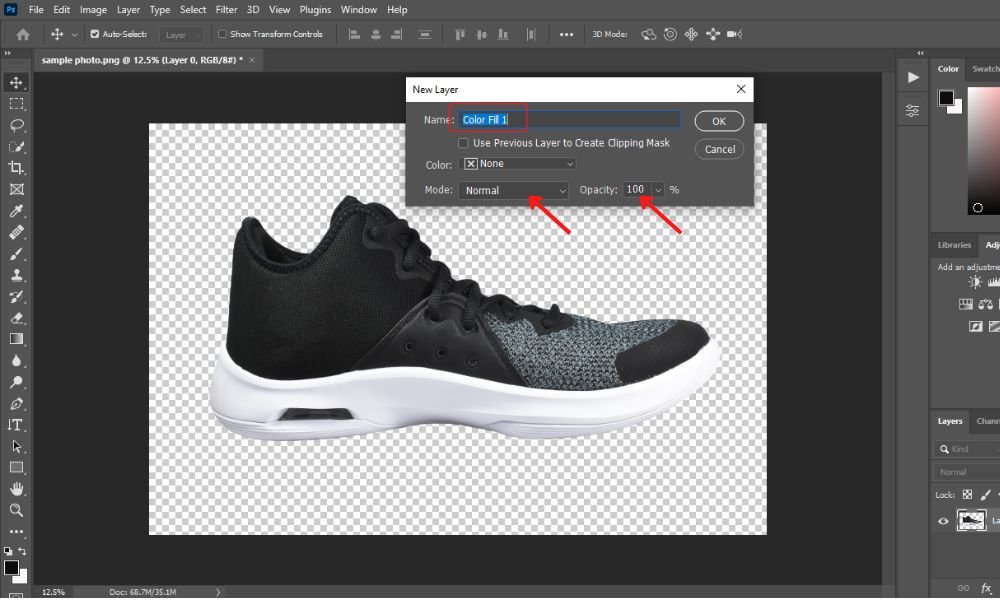
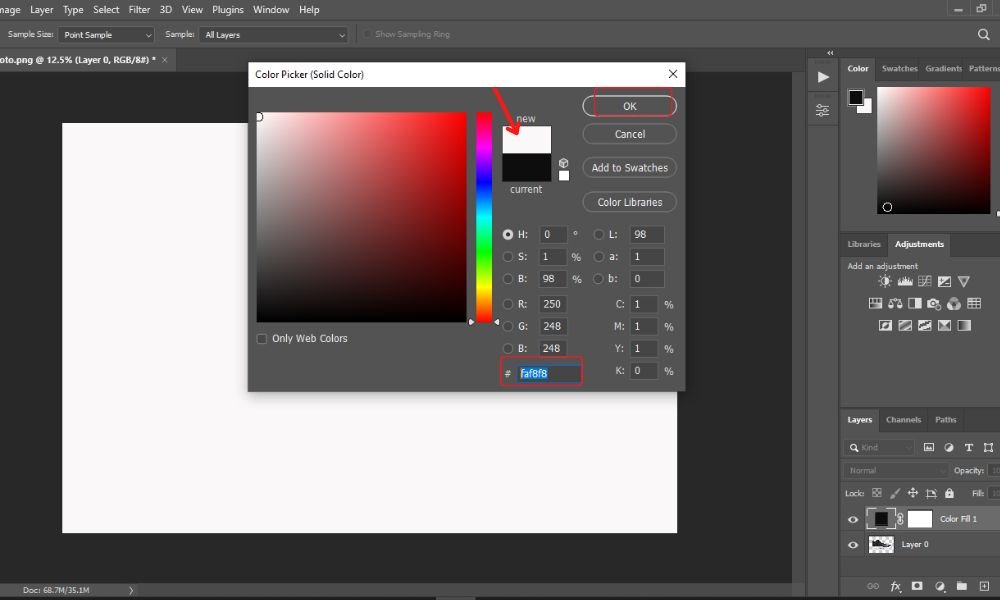
Therefore, a new window will appear named 'Color Picker (Solid Color).' Choose the white color and press the 'OK' button.
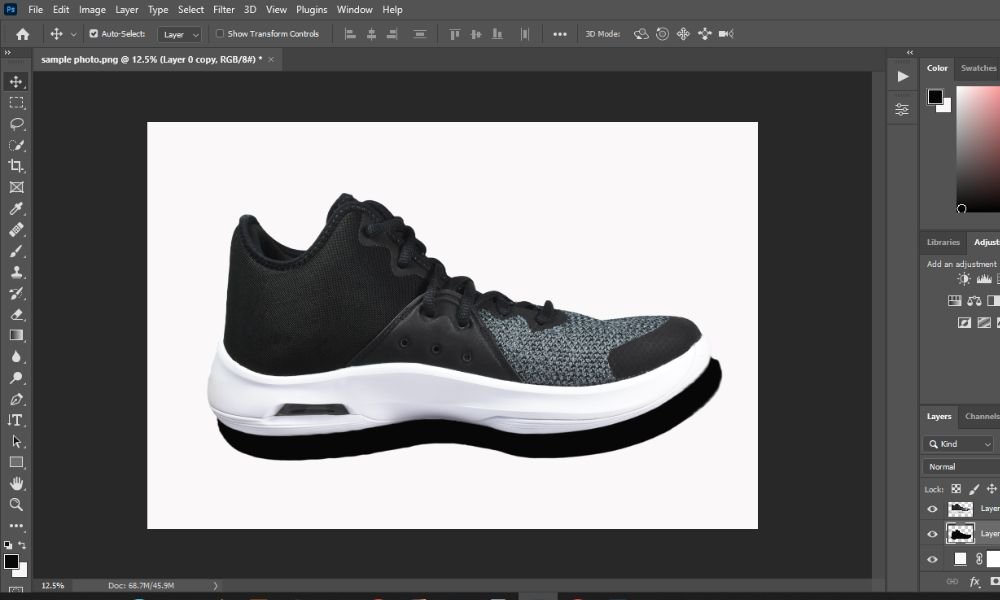
Step #3. Duplicating The Background Layer:
Make a copy of Layer 0 (background layer). To make this layer, press 'Ctrl+J' on your keyboard. Label it 'Layer 0 Copy.'
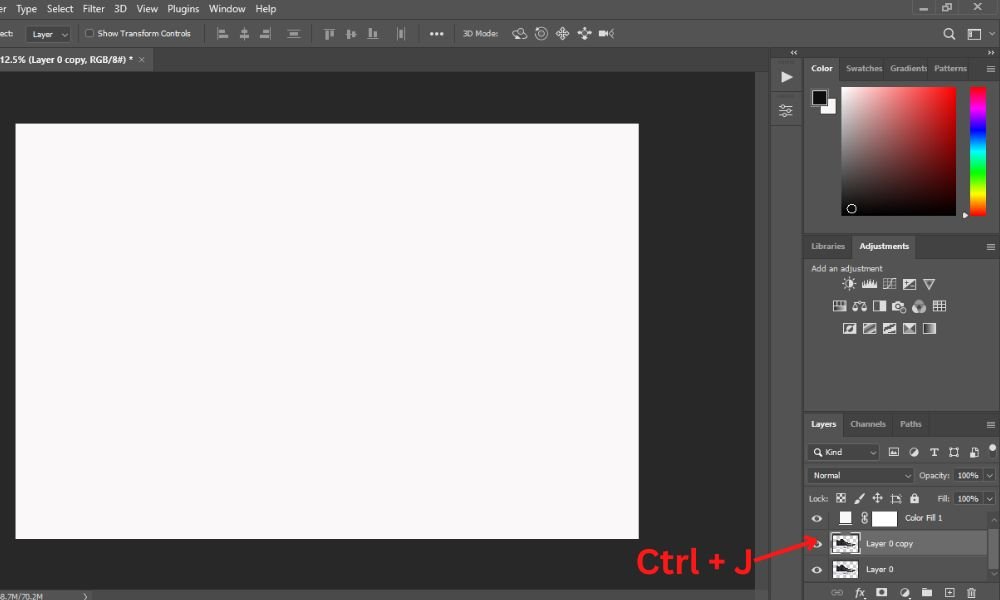
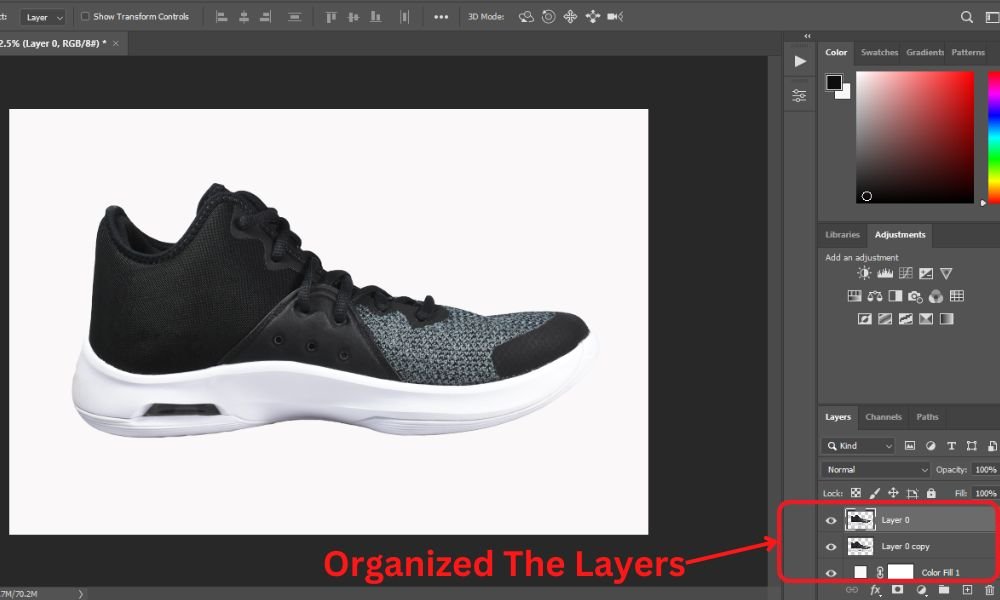
Now, you need to organize the layers under the layers panel to work smoothly.
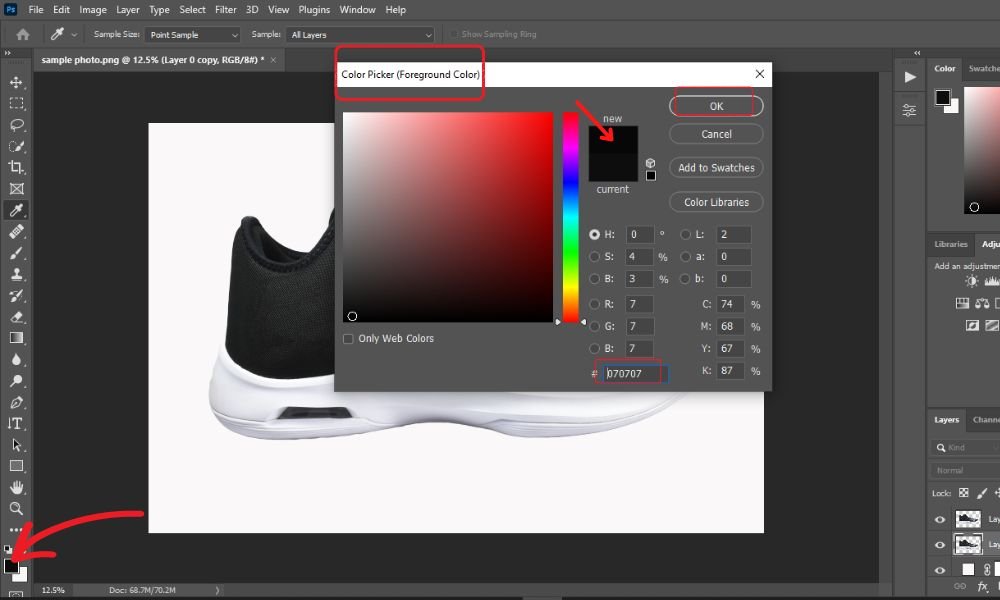
Step #4. Setting Up The Foreground Color:
From the toolbar, change the foreground color to black. Tapping 'Shift+X' will let you do this. Then press the 'OK' button.
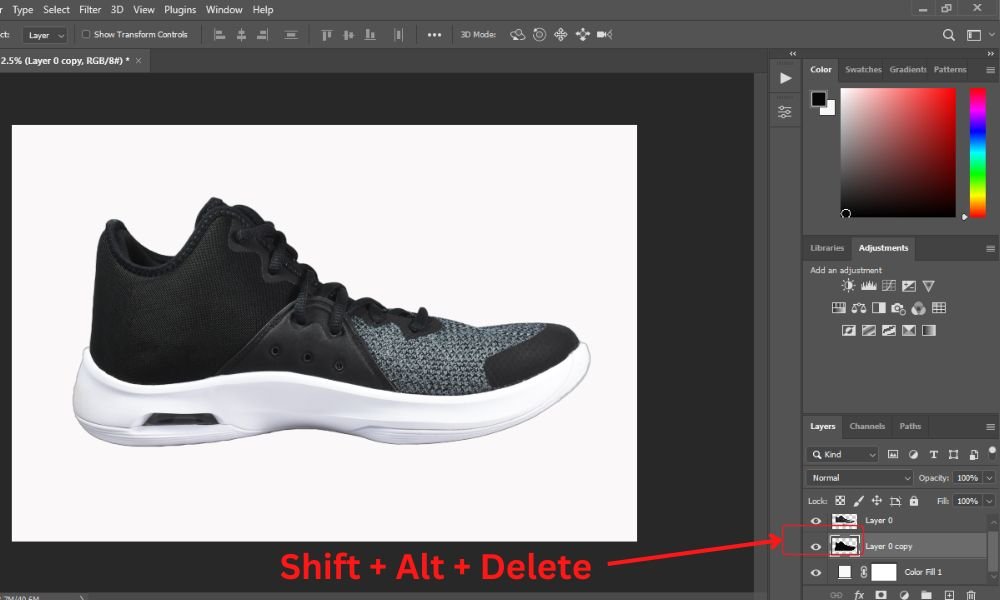
Step #5. Turning The Copied Layer Into Black:
Choose 'Layer 0 Copy.' By pressing 'Shift + Alt + Delete,' you can make this layer black. This black picture will be used later as a custom drop shadow.
Step #6. Placing The Custom Shadow:
Now, tap 'Ctrl+t' to transform for free activity.
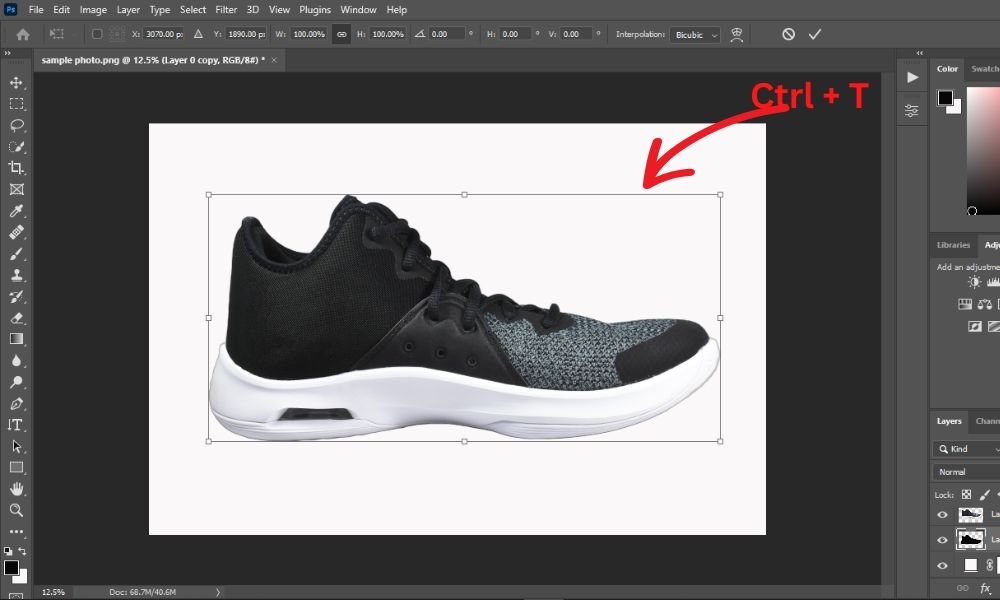
To make a shadow, press on the square and drag the black picture down smoothly.
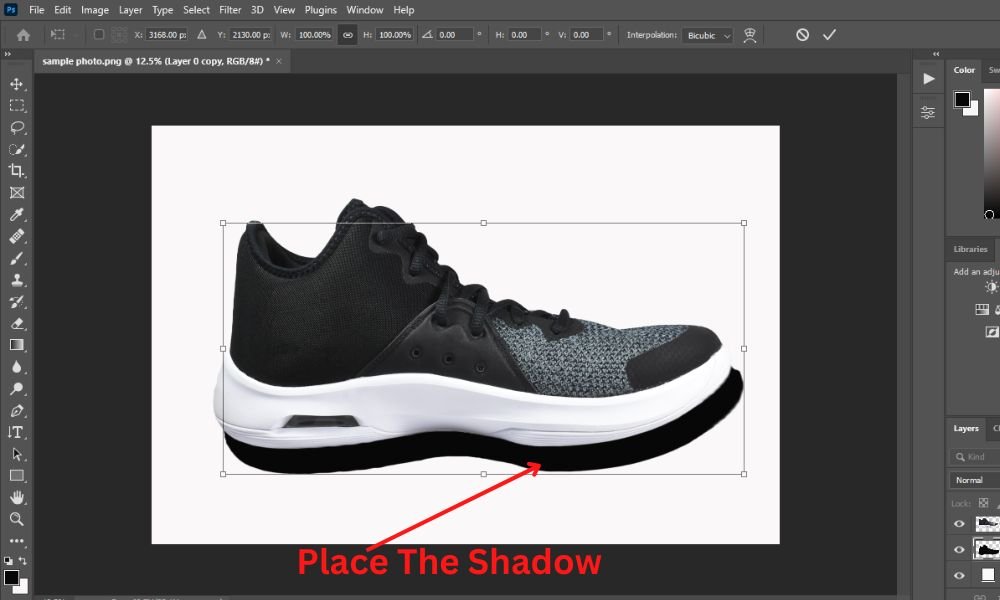
Never forget to place 'Layer 0 Copy' below 'Layer 0.' Find out where the light comes from first, then put the shadow in the right place depending on this factor. When you're done, click on the 'Enter' button.
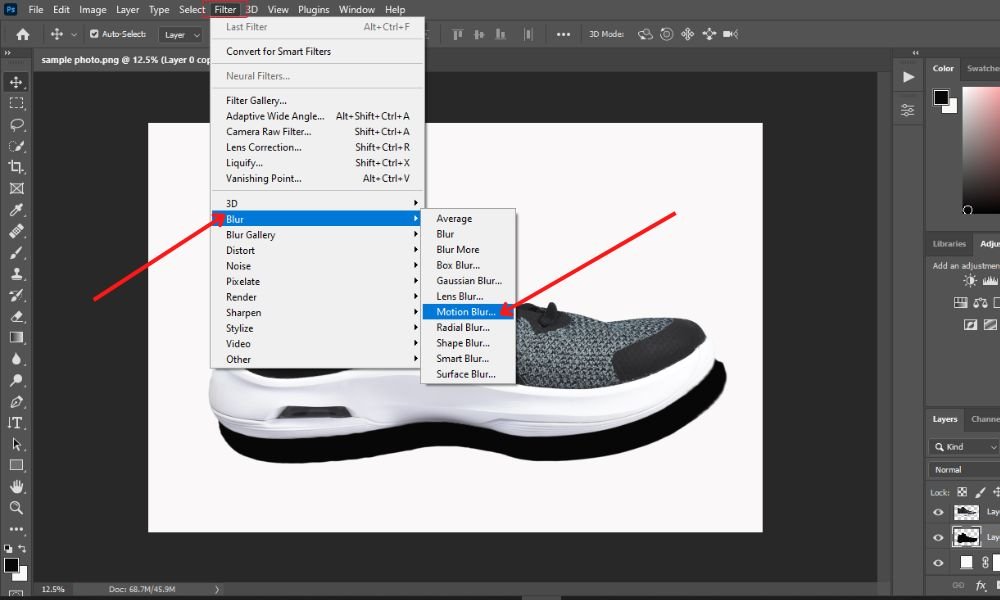
Step#7. Applying The Motion Blur:
At this stage, go to the above menu bar. Click on 'Filter' and select 'Blur' from the drop-down menu. Then choose the 'Motion Blur' option.
Briefly say, click on Filter > Blur > Motion Blur to add the motion blur effect.
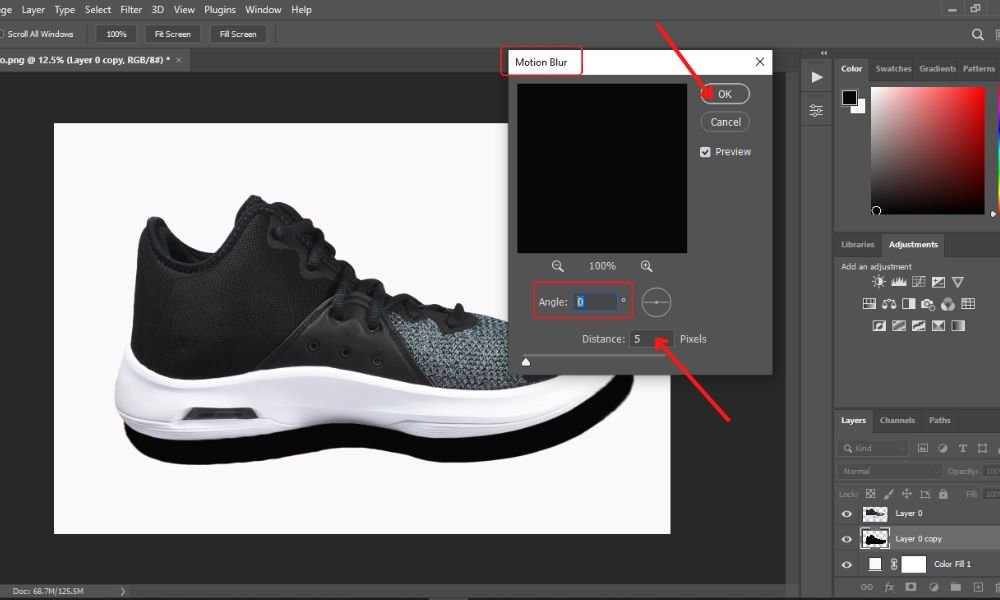
Now, a new window named 'Motion Blur' will appear. Scale the angle to 0 and change the distance (For example- scaling distance level 5 pixels) to smooth the drop shadow's edges. Then, click 'Okay' to use the effect.
Step#8. Applying The Gaussian Blur Effect:
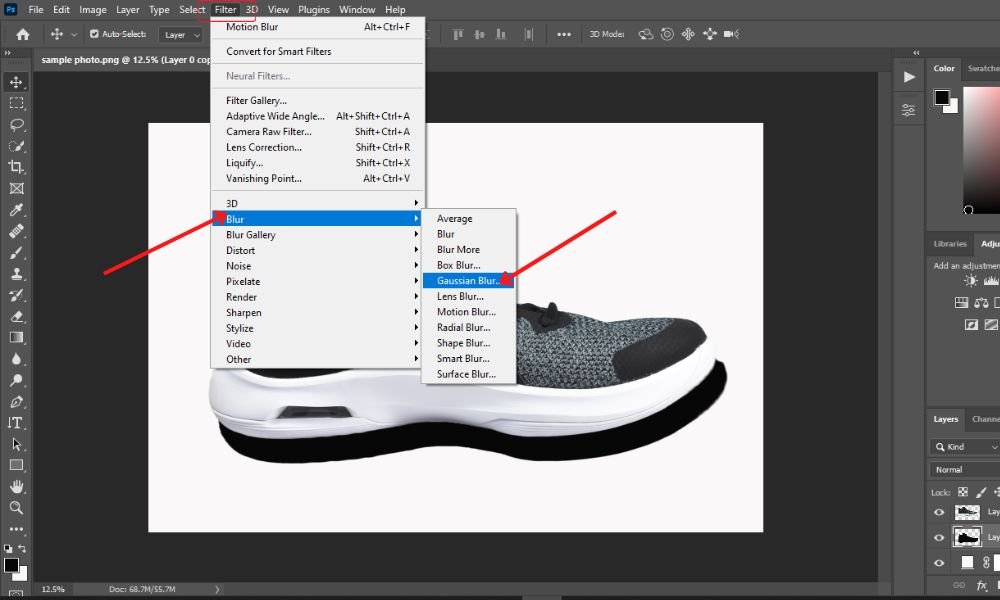
Next, you need to apply another effect named Gaussian Blur on your photo. Then, again go to the 'Filter' tab, select 'Blur' from the pull-down menu and choose 'Gaussian Blur.'
To keep this in mind, tap on Filter > Blur > Gaussian Blur to use the gaussian blur effect.
Next, the 'Gaussian Blur' pop-up will come. Here, makes the radius 3.0 pixels and press 'OK.'
![]()
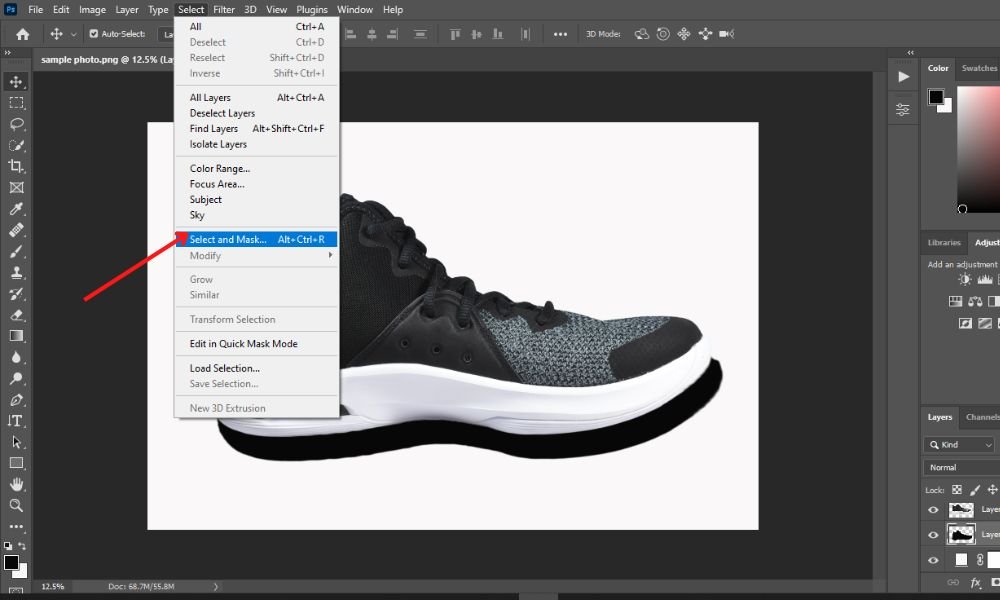
Step#9. Adding The Layer Mask:
To add a layer mask to 'Layer 0 Copy', go to the top menu bar. Tab the 'select' option and click 'Select and Mask' from the drop-down menu. Or press 'Alt + Ctrl + R' on your Photoshop interface.
In the properties panel, I've selected the 'Onion Skin (0)' to give a soft shadow.
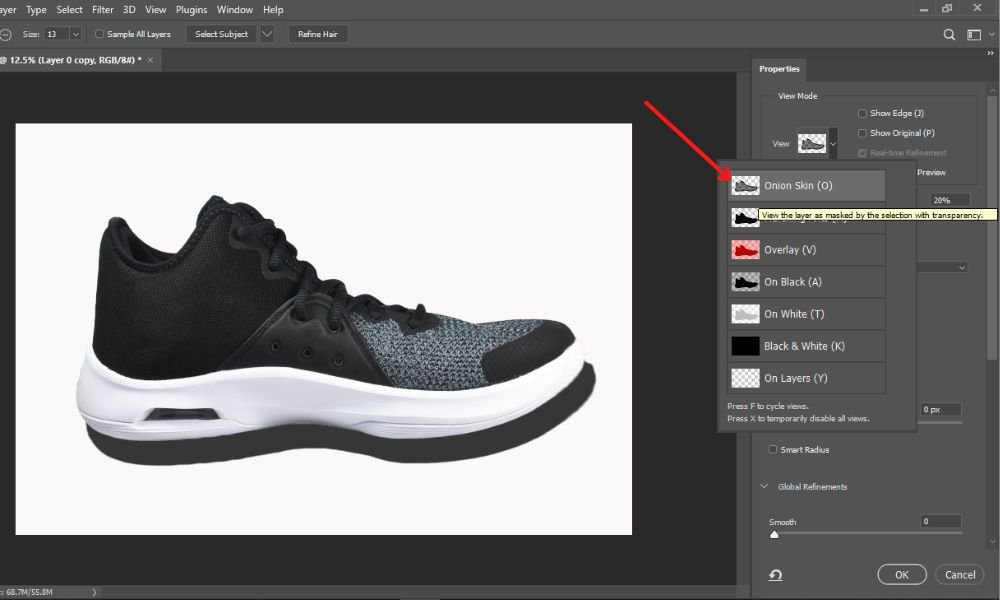
Now, depending on your photo background, adjust your transparency level. Hence, I did this to 20%.
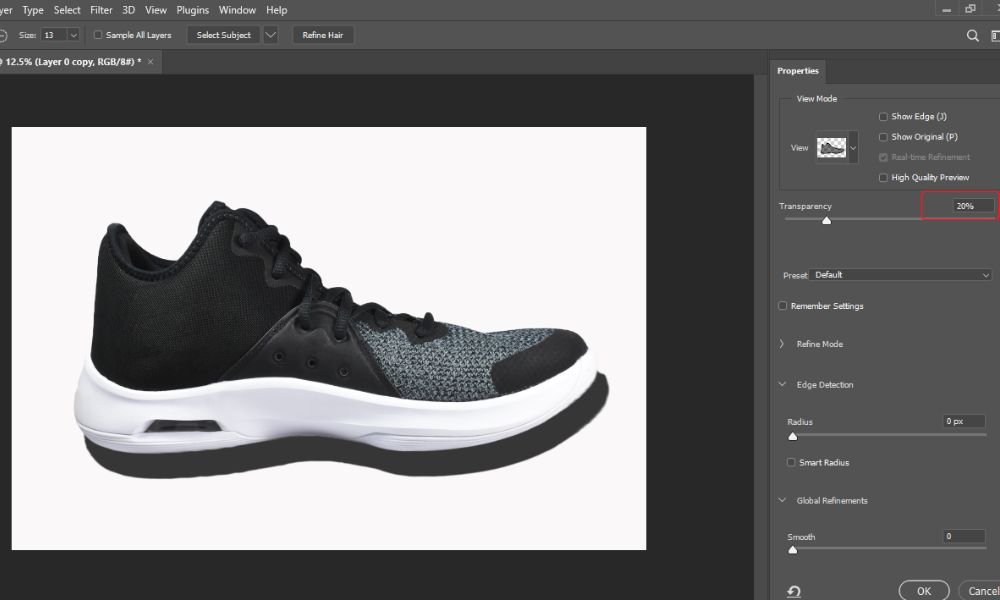
Scrolling down and making other adjustments based on your needs in the properties panel. Here, I did nothing on other adjustments; I didn't need them.
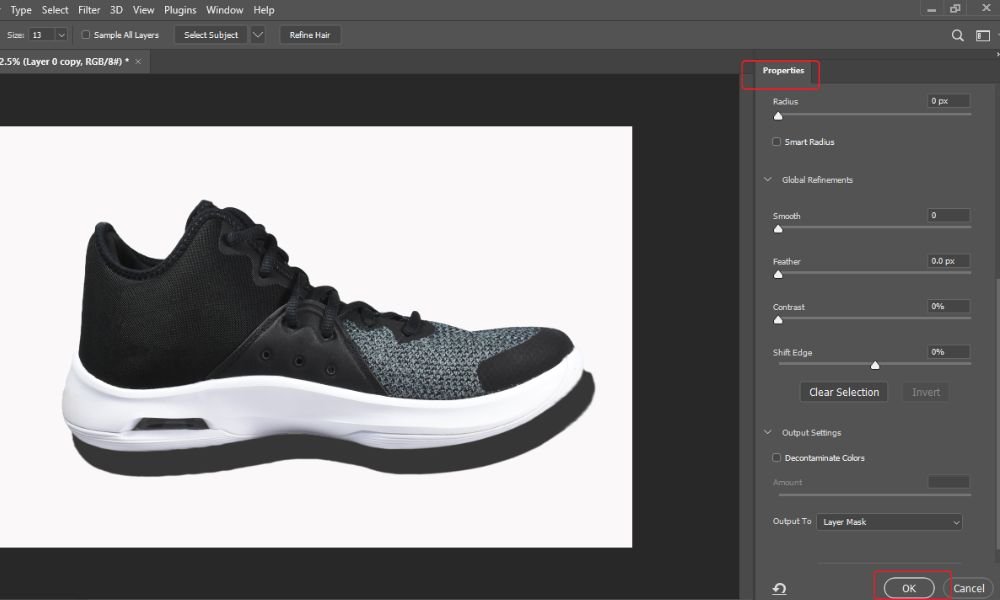
Lastly, in the 'Output To' option, select 'Layer Mask' from the drop-down menu. Then, press 'OK.'
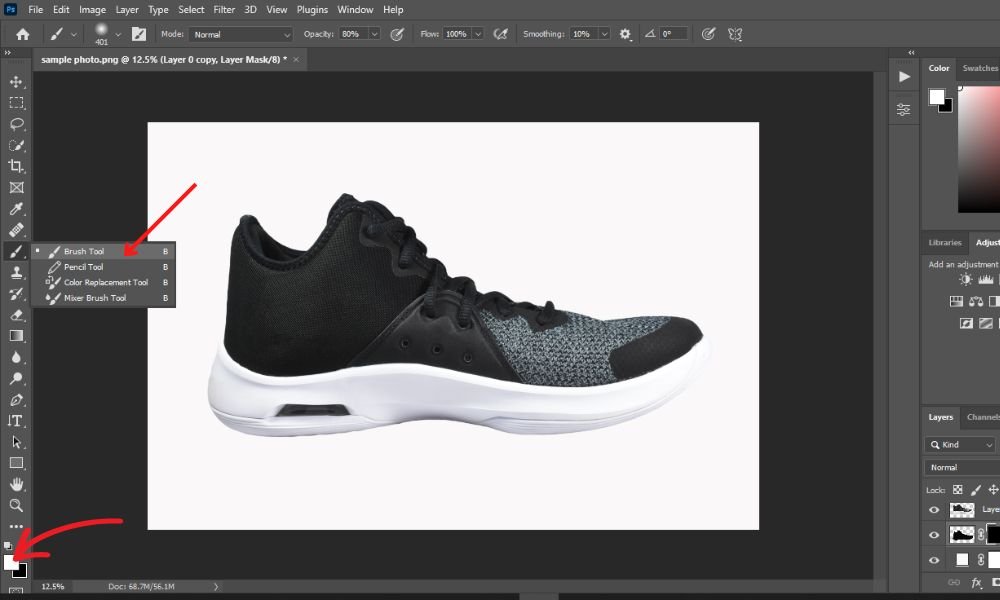
Step#10. Selecting The Brush Tool:
Now, it's the final touch; you'll add a drop shadow on your photo. Go to the toolbar and choose the 'brush tool.' Then, modify the foreground color to 'White.'
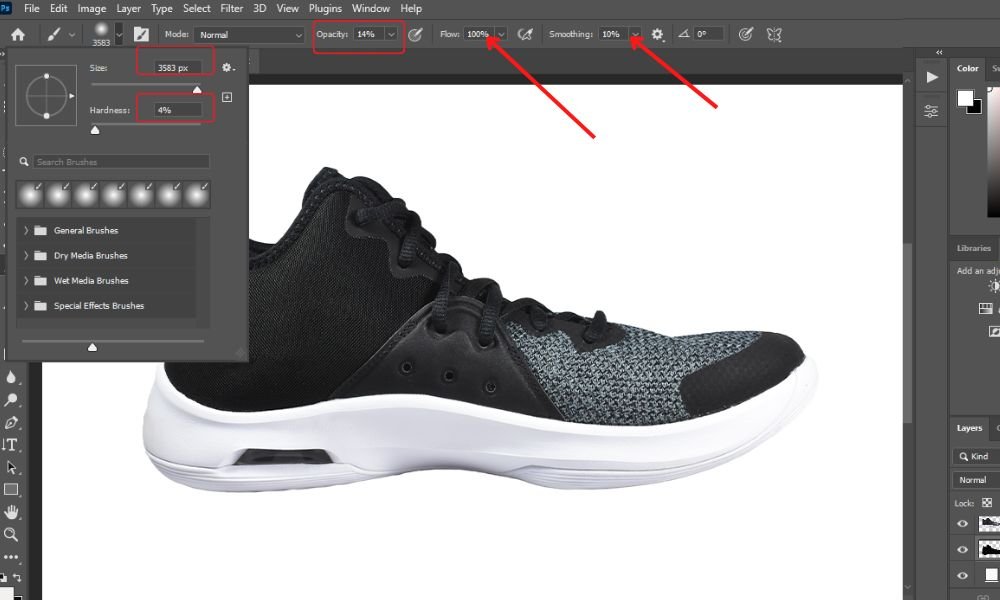
Step#11: Swiping The Brush On Shadow:
Now, you'll need to drag or polish the brush through the shadow to make it looks professional. This final part is what makes your shadow look good or bad.
Giving your image a realistic look is easy, but it's also more complex. You should know exactly how you want your drop shadow to appear. If you don't know where to stop, you'll move your brush around without a specific plan.
In this case, you need to come up with your plan. But I can tell you some simple things here to add a drop shadow in Photoshop CC.
- Keep your brush size a little bit bigger. It will help to keep the drop shadow's color compatibility.
- Modify the opacity of your brush as you get closer to the object since shadows will be greyer or darker near where they were made.
- If the area of the object is slightly higher than the ground, keep some space between the object and the shadow at the edge.
- Make the drop shadow looks real by blurring it. Take some time to do it carefully.
You can try these tips when making your custom drop shadow. But you need to keep looking for other ways to add a drop shadow in Photoshop to make the photo more realistic looks.
Always remember different techniques will work for different types of product photographs.
After setting up all the adjustments appropriately, swiping the brush smoothly on the photo to add a drop shadow in Photoshop that looks natural. See the below image.
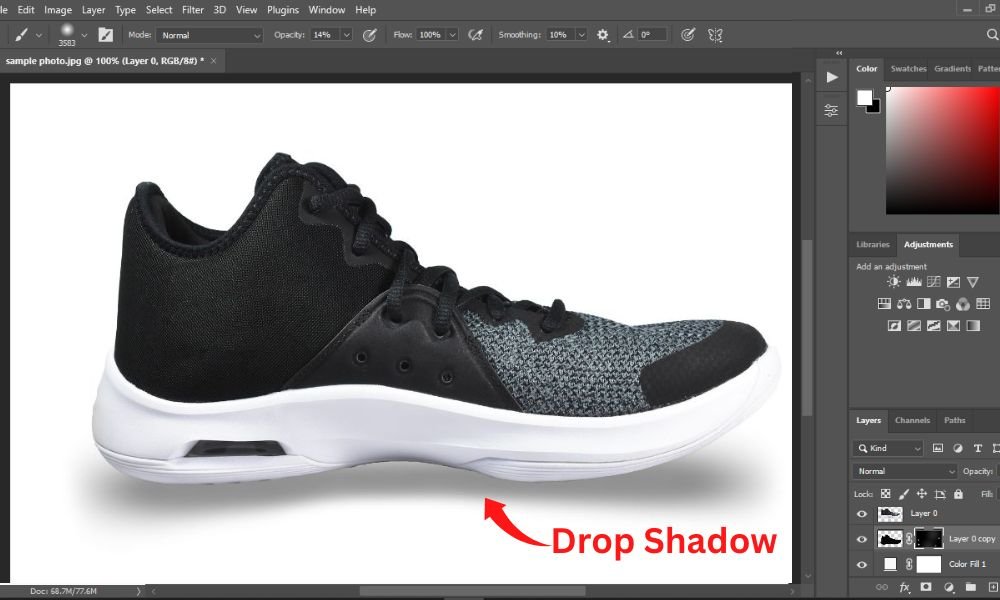
Now, deselect the brush tool by pressing on the move tool. Then, here is the final output. It’s always a good idea learning how to add a drop shadow in Photoshop CC.
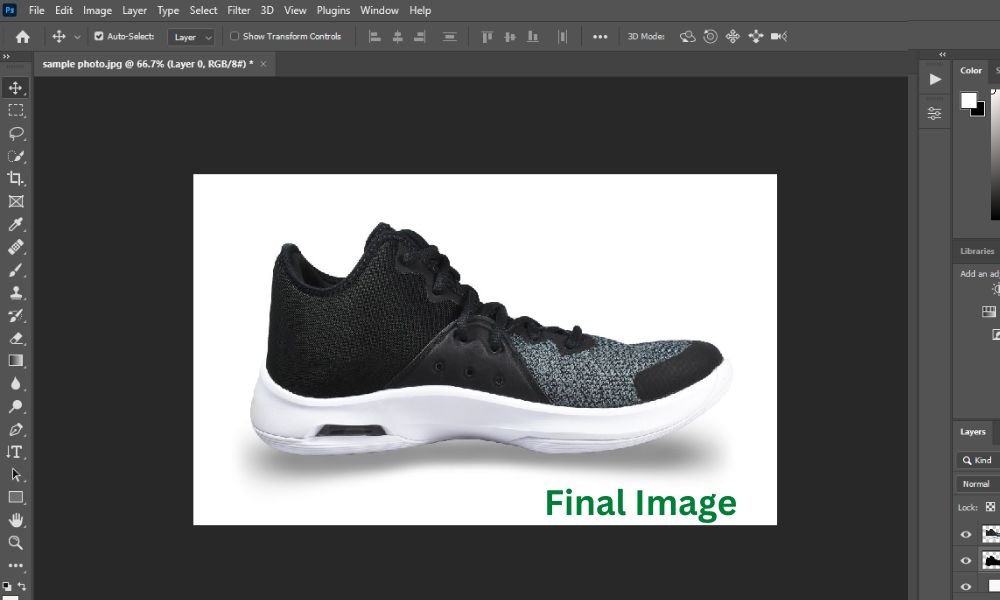
Step#12. Save Your Image:
Once you are satisfied with your drop shadow, save the picture. For future usage, save both the PSD and JPEG formats. For online platforms, you'll need a JPEG file, and the PSD format will allow you to change the picture whenever you need to.
Final Words About How To Add A Drop Shadow In Photoshop:
After reading this tutorial post, we hope you've learned something new. So, we've mentioned the key steps, which are all you need to do to give your photo a drop shadow.
Did you think it was impossible? Don't think like this. Impossible is nothing. But it's very easy to get stuck using Adobe Photoshop CC. If you don't have enough time to add a drop shadow on your photos, feel free to hire an experienced Photoshop service to get your desired output within your reasonable budget.
Furthermore, you can easily add a drop shadow in Photoshop if you edit only a few photos. But it can be hard if you need to edit bulk photos for your e-business. Relax, and let our Photoshop specialists take care of all your product photos.
In the end, to create drop shadow Photoshop effect is a key part of making the photograph look better. If you add a flawless drop shadow to your product photo, it will go to the next level with its appealing style.
Keep an eye on our latest Photoshop tutorials to learn more about photo editing tips with Adobe Photoshop CC.
To read more, check out- How To Make Gradient In Photoshop?
Thanks for reading!